Blog
OpenEnergyMonitor

Solar PV excess power into immersion water heater using emonTx, emonGLCD & MKII triac code - in development

From the forums: Solar PV excess power into immersion water heater using emonTx, emonGLCD & MKII triac code

jrobbie (on the forums) writes:

As there appears to be a considerable amount of interest in getting an emonTx unit running Robin’s MK2 code (calypso_rae on this forum) and communicating with emonGLCD / emon Base … I thought it was about time I publish where I am at with my project.

The emonTx with CT1 connected to the Grid, and CT3 connected to the Solar PV generation meter, AC psu and 5v USB supply are also connected.

emonGLCD with modified code
emonTx with additional tri-color LED to indicate immersion heater status

Consumer unit containing MOC3041 triac
So many thanks to Robin for the MK2 code, Ian for the Calibration code, Glyn and Trystan for the building blocks as well as Paul Reed, Stuart and Robert Wall who have all made major contributions via this forum and get us to where we are today.
Read full post including emonGLCD and emonTx software sketches on the forums here

Queuing packets on the basestation and bulk sending to emoncms

As we connect more and more wireless nodes to a basestation, with each wireless node transmitting every 10s or so we quickly start to have a situation where the basestation is trying to make several connections to the server every second.

The question is, does the rate of connections matter? Is it bad news for the emoncms server and what is the effect on the local internet connection, router?

Although I have not investigated this in detail, Im pretty sure Im seeing an adverse effect on my internet connection if the post rate gets too high, I noticed this especially the other day when I changed my router to a bt homehub after a lighting strike took out the old router. It would be great to get some good data on this.

Then there is the question of server load which needs more investigation.

Jumping to a solution before the problem is properly characterized, the solution that comes to mind is to queue packets received from wireless nodes in the basestation and then do a bulk post at a slower rate, such as once every 20s or longer.

I have put together an initial working example of this, including code for both the NanodeRF basestation end and the emoncms server end.

Starting with the NanodeRF code:
https://github.com/openenergymonitor/NanodeRF/tree/master/NanodeRF_multinode_bulksend

The NanodeRF code queues packets received, including a time offset between packets so that they can be stored in emoncms at the right time when they get there (although the implementation for this is a little rough at the moment).

The packets are queued in a string that can be sent via the ethernet and then decoded simply in emoncms using json_decode();

A string for 3 packets from the different nodes looks like this:
[[0,16,1137],[2,17,1437,3164],[4,19,1412,3077]]

The first node: [0,16,1137]

The first number of each node is the time offset, so for the first node it is 0 which means the packet for the first node arrived at 0 seconds. The second node arrived at 2 seconds and 3rd 4 seconds.

The second number is the node id, this is the unqiue identifer for the wireless node.

All the numbers after the first two are data values. The first node here (node 16) has only once data value: 1137.

This string is sent to emoncms every 20s in the example and there is enough room in the string buffer to store up to 400 characters or about 22 low power temperature node packets, this may be extendible by another 200 characters for more storage, and maybe a lot further with an SD card or other larger storage medium.

The emoncms api for sending bulk data is emoncms.org/input/bulk?data=

Emoncms then decodes the string, registers and processes the inputs and returns an ok.

If your interested in testing this out, here's the NanodeRF bluksend example again, if your using the NanodeRF_multinode code already this is just a straight switch to the bulk send code:
https://github.com/openenergymonitor/NanodeRF/tree/master/NanodeRF_multinode_bulksend

If your running your own server you will need the latest emoncms version:
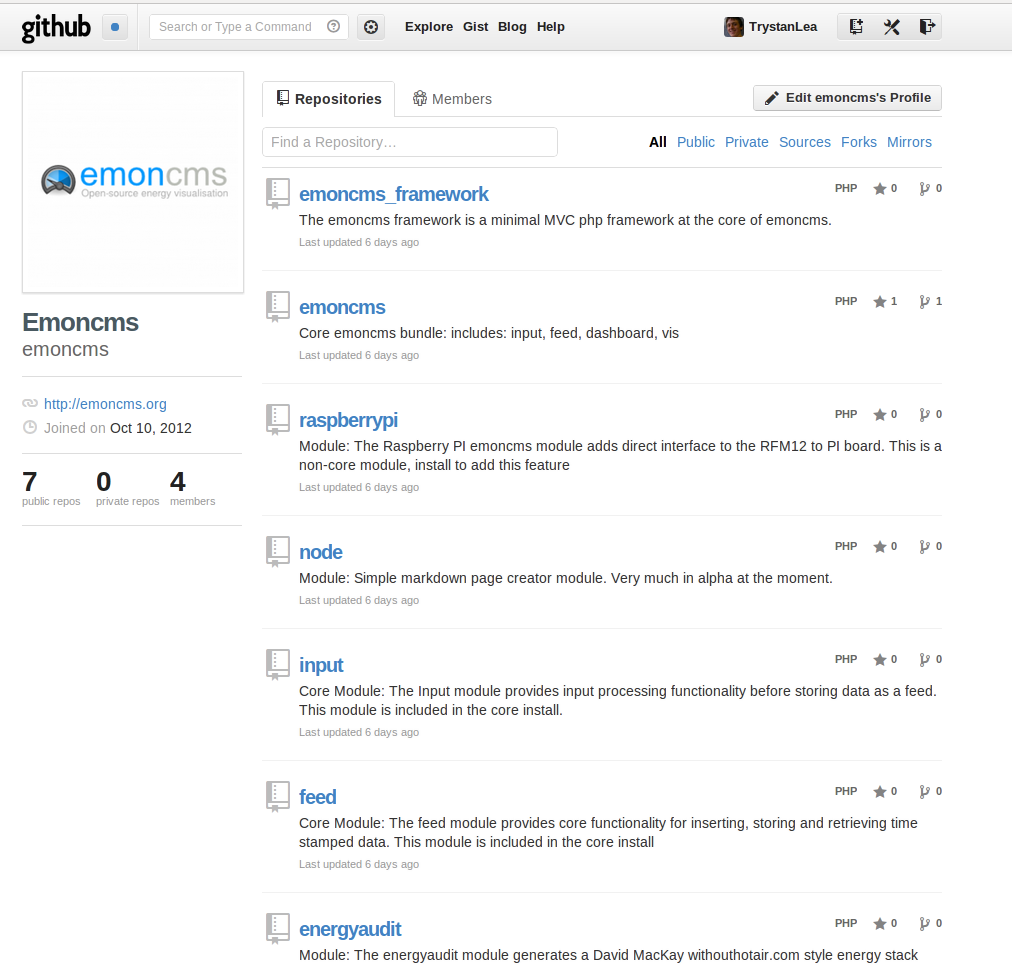
https://github.com/emoncms/emoncms or if you are using emoncms.org its all ready to go there.

There's a couple of question marks at the moment as to the stability of this initial working example, I had a few problems with the queue string getting malformed but only once every 20-30 successful string builds and at the moment the nanodeRF does not reset itself using the watchdog if there are more than 10 unsucessful attempts. A few extra eye's on the code would definetly help to improve it and I will keep testing here.

Raspberry Pi emonBase

The Raspberry Pi needs no introduction, it's a great piece of hardware. A low power, low cost Linux credit-card sized computer made in the UK. As soon as we heard of the Raspberry Pi we knew it would make a great emonBase energy monitoring base station. 

Raspberry Pi with RFM12Pi Expansion

The Raspberry Pi is powerful enough to run a web server running emoncms open-source logging and visualisation web-app while being low power enough to be left running 24/7.  

Using the Raspberry Pi to log energy monitoring data locally (onto it's SD card) has advantage of not having to be reliant on a stable web connection when logging to a remote sever and gives you total control over your data. 

Working with Martin Harizanov we have designed an open-source expansion board for the Raspberry Pi which enables the Pi to receive data via wireless from other OpenEnergyMonitor modules e.g emonTx energy and temperature monitoring node or an emonGLCD wireless LCD display. The RFM12Pi is now available to buy through the OpenEnergyMonitor shop.

RFM12Pi Raspberry Pi GPIO Wireless Expansion Board  

A Raspberry Pi running emoncms with an RFM12Pi expansion board can be used as a powerful emonBase base-station to log, process and visualise energy, temperature and other environmental data. Data can be logged locally to the Raspberry Pi's SD card and/or to a remote emoncms server. Emoncms graphs and dashboards are served from the Raspberry Pi's web-server. Checkout the documentation links below for more information and setup instructions. In the future we plan to release a 'ready to go' Pi SD card image with emoncms pre installed and configured to work with the RFM12Pi.  

Thanks to Baptiste Gaultier for this nice emoncms dashboard example

Documentation Links:


Updated installation and upgrade guides for latest emoncms release

Following on from my previous post on the new modular version of emoncms: http://openenergymonitor.blogspot.co.uk/2012/10/emoncms-development-update-modules.html

Here are the updated installation and upgrade guides:


Linux installation Ubuntu/Debian/PI

Windows installation

Here are some of the new features, interface improvements in the latest version:

New feeds interface with tag based grouping and in-line editing:


New visualisation page interface that makes it easier to explore the different visualisations available including drop down menu's for selecting feeds.


Database schema upgrade script can now be called from within the admin account (first account created).


Modular implementation as detailed in the previous blog post:
Several optional modules available for extending emoncms such as the raspberry pi module for communication with the RFM12PI board.


I have created another bug and dev list forum post for this month, November here: 

Emoncms bug and dev list NOVEMBER 2012

Ciseco Visit

Earlier this week I visited Miles Hodkinson who runs Ciseco.

Ciseco supply us with the Open Kontrol Gateway web-connected base station, however Ciseco are best known for their range of wireless modules based on the Texas Instruments CC1110 chip. Most of Ciseco's products are manufactured by themselves in the UK. It was a fascinating visit to see the manufacturing process in action. I took a few photos which might be of interest to those of your who are interested in how things are made.

The surface mount electronics assembly process has got three main stages:

1. Apply solder paste on the PCB pads, this is done using a scraper and carefully aligned laser cut stencil.

 
Solder pate application

2. The pick and place machine places the SMT components in their correct locations and orientation on the board

Pick and place - the components are supplied on the white reels

3. After a quick visual check the board with the placed components is put in the reflow oven for a precise amount of time at a carefully monitored temperature profile. This melts the solderpaste and solders the components into place.


Reflow Oven
The finished boards are then taken away to be flashed, tested then finally the through-hole components such as the antenna socket are soldered on by hand.

The finished boards 
 View the full galley of photos including some videos of the pick and place in action:

Ciseco visit


Pre-assembled Nanode RF


We're happy to announce that we are now selling Nanode RF web-connected emonBase gateways pre-assembled. This makes it even easier and quicker to get started with energy monitoring: 


The pre-assembled Nanode RF using surface mount electronics has been designed and assembled in the US by Wicked Devices. The Nanode was originally designed by our friend Ken Boak. Ken has written  an interesting blog post giving a brief history of the Nanode.

Ken writes: 


Nanode was conceived back in the summer of 2010, when I returned from a trip to Shenzhen, China. I was between jobs, and had a bit of time on my hands for tinkering with some new product ideas.
Nanode arose out of the need to find a cheaper way of connecting simple open source hardware, such as Arduino to the internet, so that Arduino could be used for a range of sensing and control applications.

Early Nanode prototype controlling an RGB lamp
Read his full blog post here: http://sustburbia.blogspot.co.uk/2012/10/a-brief-history-of-nanode.html


Emoncms development update: Modules

I've been a little quiet over the last few weeks, emoncms blogposts and progress updates have been far and few between but that does not mean there has been no development progress happening, to the contrary there has been a lot of significant development work been going on.

I outlined at the start of the month in the october emoncms bug and dev list the idea of re-factoring/reorganising emoncms along more modular lines, pointing to some earlier thoughts on it. Since then I made the leap and started the re-factoring process, Ilde gave me a lot of help with splitting up the language files for translations, and good ideas for menu system implementation, Baptiste Gaultier  gave me some impetus to look at modularising the dashboard widget code and now we are almost there.

The old structure had a folder for Controllers, Models and Views, with all the different controllers, model and view scripts for a feature mixed in together in these folders and also some files such as setup.php which had code in it for all the different features. As the application was growing this was getting a bit unwieldy, harder to understand/read the code, add new features and keep track of development.

This is how the old structure looked like:

Controllers
  feed_controller.php (part of feed module * )
  input_controller.php (part of input module * )
  ...
Models
  feed_model.php (part of feed module *)
  input_model.php (part of input module *)
  ...
Views
  feed_list_view.php (part of feed module *)
  input_list_view.php (part of input module *)
 
setup.php (mixed code for input, feeds, etc) - if you add a new module you had to add db schema code in here.
notify.php (part of notify module but in the root emoncms directory)
* Module or feature specific files are all in different locations 

By changing the structure:

Modules
  feed
    feed_controller.php
    feed_model.php
    feed_list_view.php (includes no feed message)
    feed_schema.php
  input
    input_controller.php (merged with enum.php)
    input_model.php
    input_list_view.php (includes no input message)
    input_schema.php

and following the following design principles:

  • A module add's functionality in a self-contained way - not requiring (or minimizing as much as possible) modification of any other modules or the core framework.
  • A module can depend on another module. ie dashboards depend on feeds but feeds does not need to depend on dashboards.

I think this change gives us the following benefits:

  • Clearer application structure - easy to find module specific code
  • Adding a new module is really easy, you dont have to put the controller in the controller folder, the view in the views folder, model in the models folder, database setup in setup.php, all you have to do is download the module folder and place in the modules folder.
  • We can then use git to develop particular modules independently of the rest. A developer looking at commit logs therefore only needs to concern themselves with that particular module rather than the application as a whole.
  • Its easier to test modules and the framework independently of each other.
  • More developer autonomy, project self organisation. You can add a module to the optional modules list without having to coordinate closely with the main emoncms bundle.
The new modular emoncms version can be found here:

https://github.com/emoncms/emoncms

Given the potential escalating number of repositories as new modules are added I though it would be best to create a dedicated github organisation for emoncms hence the new location. If you go to: http://github.com/emoncms you will see quite a few repositories:


The emoncms repository is the main emoncms bundle which is build up from the emoncms_framework and the other core modules such as input, feed, dashboard and so on. Then there are repositories for the framework and modules independently of the main bundle including modules that are not in the main bundle such as the raspberry pi module which I will come back to in the next post.

The idea being that the main bundle could be built automatically from the module repositories and the framework and that the commit history could be on a module basis.

Adding a module
To add a particular non core feature such as the raspberrypi interface module to your emoncms installation its now just a matter of downloading the raspberrypi repository and placing it in the modules folder of your emoncms installation, much the same way as you add libraries to an arduino project.

Things to complete
As I mentioned at the start most of the refactoring work has been done but there are still some parts that are not complete such as the notify, admin and statistics module and there are some missing message boxes such as when no inputs, feeds or dashboards exist that need to be re-added.

The feed module implementation is also a little different in that the there is no longer a feed_relation table that used to link a user to their feeds, this is now handled in the feeds table which simplifies things but means a simple database migration process needs to take place if your upgrading from an old emoncms version, I will write a short script to do this soon and document the migration process.

Another important change is the API used to post data from basestations to emoncms what used to be api/post is now input/post as this action is handled by the input module. You can if you want sidestep input processing completely and just use the feed module which now has a full api. The api calls for both the feed and input module are documented in helper pages linked to from the top of the input and feed pages.

That's it for now, in the next few post I will discuss the raspberrypi module and also how to migrate from the old emoncms version.

Introducing the emonTx Shield

The OpenEnergyMonitor project started in 2009 playing about with an Arduino Duemilanove. Since then the project has very much built on the Arduino platform, both hardware and software. 

We love Arduino, it's fantastic how quick and easy Arduino makes it is to get started blinking an LED and or reading an analoge voltage level.

With that in mind it's with great pride that we are launching an Arduino compatible emonTx Energy Monitoring Shield to make getting started in energy monitoring just as easy. 


We are very pleased that the emonTx shield is compatible with the new Arduino Leonardo as well as the Uno and Duemilanove. 

The emonTx Shield has got four CT current sensor inputs, an AC voltage sample input, on-board temperature sensor and RFM12B wireless transceiver. With just a CT sensor the shield can monitor current and apparent power. With the addition of an AC-AC adapter to provide an AC voltage sample the shield can monitor real power, AC RMS voltage and power factor. 

The inclusion of the RFM12B wireless transceiver enables the emonTx shield to integrate with other OpenEnergyMonitor modules such an an emonGLCD display unit an emonBase web-connected base-station for logging an visualisation with emoncms

The emonTx shield is now available as a full kit (with or without the RF module) or PCB only in the OpenEnergyMonitor shop

As with all OpenEnergyMonitor hardware modules it's fully open-source, fully documented and has got plenty of Arduino example software sketches. Follow the links from the main documentation page: http://openenergymonitor.org/emon/emontxshield

The emonTx Shield is based on the popular emonTx a low power stand-alone energy monitoring unit. The stand-alone original emonTx is better suited to long term energy monitoring installations and/or low power operation. The original emonTx can also be bought in kit form from the OpenEnergyMonitor shop.    

If you have any questions or run into problems please post on our active community forums

Thank you to everyone who has helped contribute to the project.

Display live emoncms energy data on your desktop

Alexander Price ‏@saelaenx has documented a neat setup where he uses Geektool on his Mac to pull his live energy data and current temperatures from emoncms. The data it's self comes from an emonTx, emonGLCD posted online with a NanodeRF.

It would be great to have a similar arrangement for Ubuntu Linux using open-source tools, that way I can have have the same on my desktop :-)

The same goes for an android widget to display my live energy data on my home screen...one for the future.

Great work Alex, read his full blog here and see below for a summary:

Since I got a few people asking about this on twitter I decided to write a quick blog post on how I set up my current Geektool arrangement. Obviously this method only works on a mac, but I imagine a similar result could be achieved on Windows using Rainmeter.
GeekTool Desktop Widget 

emoncms dashboard

emonGLCD with Alex's nice custom monospaced fonts

Read his full blog post here: http://saelaenx.wordpress.com/2012/09/27/geektool-setup/

Logo Ideas

Recently our friend Gwil has knocked up a few logo possibilities for the OpenEnergyMonitor Wiki.

Gwil has also made some gorgeous little context icons we will be using in our new front page re-design soon.