Blog
OpenEnergyMonitor

Air Quality Egg

The Air Quality Egg is a sensing device which facilitates a community-led network that gives people a way to participate in the conversation about air quality.

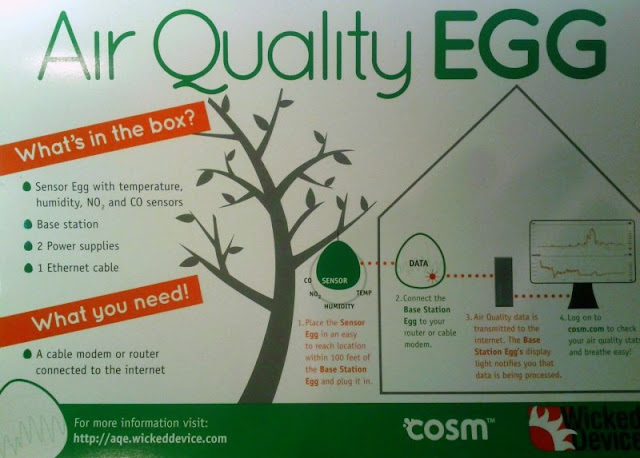
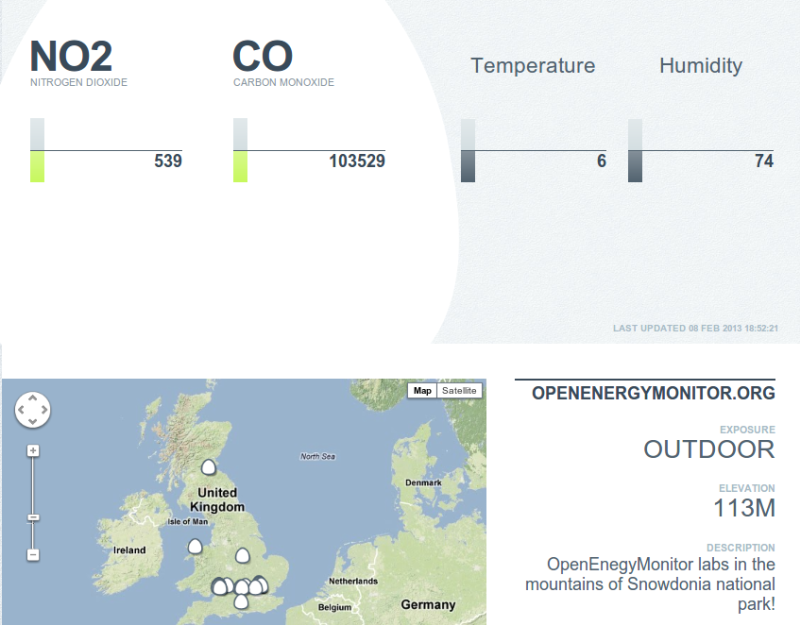
The Air Quality egg monitors local Co, No2, Temperature and Humidity levels. Reading from the Air Quality Egg can be shared and compared on a web-based crowd sourced dashboard at: http://airqualityegg.com

We're very pleased  to be the UK/Europe distributor for the Air Quality Egg and air quality Arduino Shields on behalf of Wicked Device.

Air quality is important to our health and something which is easily overlooked. Although the Air Quality Egg is not strictly an energy monitor it's very similar hardware and web-connectivity wise. Over time we would like to make it possible to integrate the Air Quality Eggs sensors it into an existing OpenEnergyMonitor system.


The project was funded as part of a successful Kickstarter (actually once of the 20 top kickstarter projects of 2012!), the Air Quality Eggs are manufactured in the US by Wicked Device.

Hardware

Hardware wise the Air Quality Egg is two NanodeRF SMT's, one with an Air Quality Egg Sensor Shield (temperature, humidity, carbon monoxide and nitrous dioxide sensors) + mini fan and the other with an Ethernet controller and an RGB status LED which illuminates the egg housing. The sensor egg should be located outdoors (but undercover) and the base-station egg plugs into your home Internet router. The units communicated via 433Mhz RFM12B.

Cracking the egg open  - eggs from OpenEnergyMonitor shop will include UK / Euro plugs
The two eggs (transmitter and base-station) collectively consumer 4W of power. 

Software

Firmware - The AQE is Arduino compatible.  It uses many of the same libraries and a Nanode emonBase (e.g JeeLib and EtherCard). The AQE can easily be re-programmed with a USB to UART cable (included) and Arduino IDE. All the firmware is up on GitHub. All the AQE's from OpenEnergyMonitor will be shipped with the latest firmware (V1.03 as of 8th Feb 2013). 

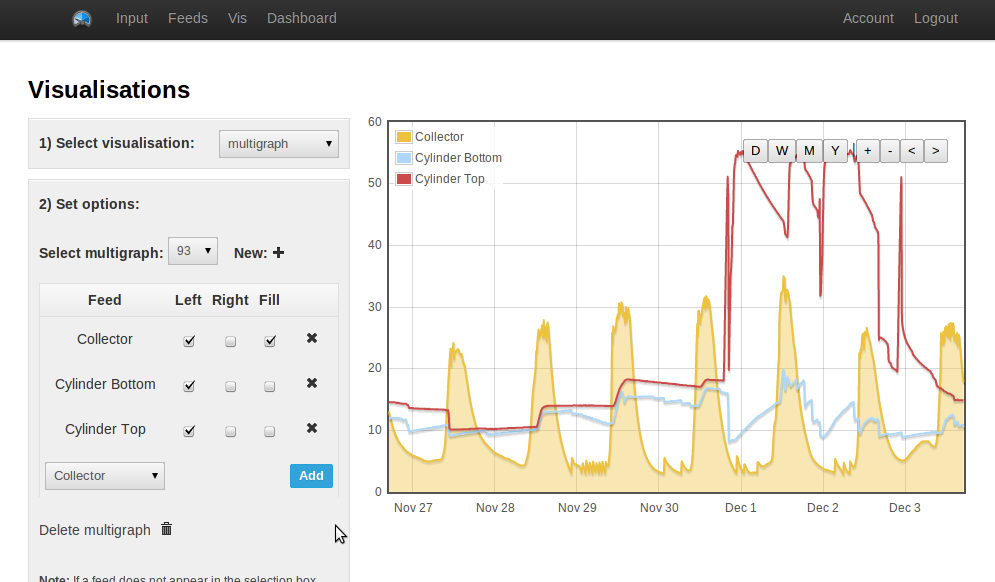
IoT Cloud - Cosm is used as the data store for the AQE. A neat open-source Ruby web-application has been written to display a crowd sourced web-dashboard with a nice Google map showing egg monitoring locations. 

http://airqualityegg.com/ - let's get some more European eggs activated! 

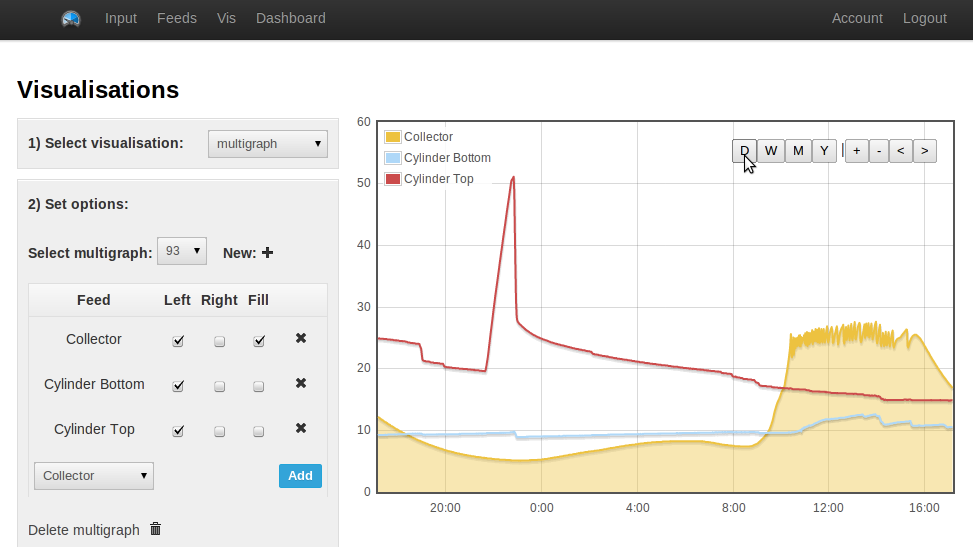
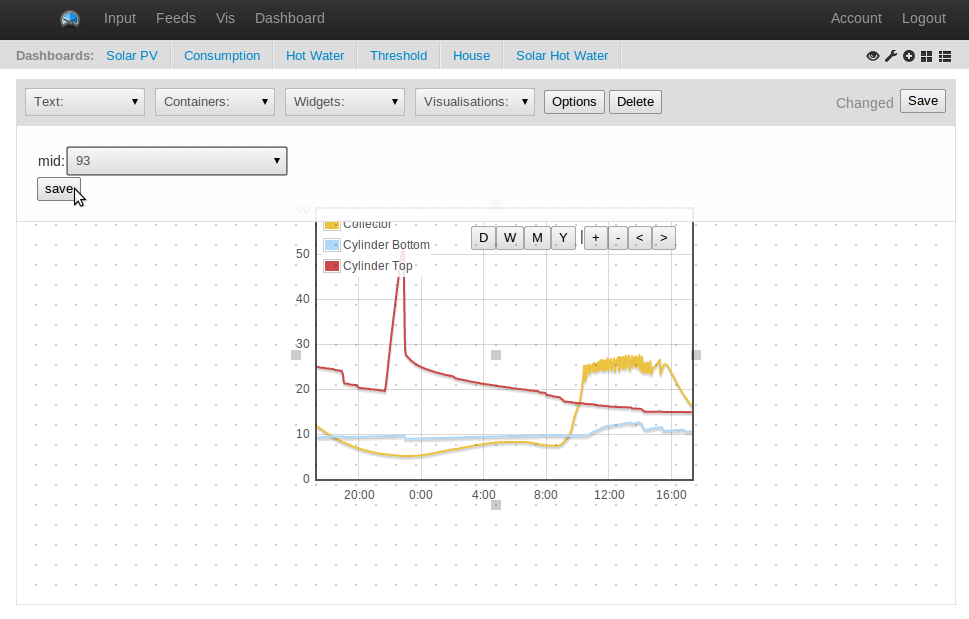
Example Air Quality Egg Readings from the OpenEnergyMonitor labs, readings may be in-correct. Sensors take a few days to 'burn-in'. See here for the live version: http://airqualityegg.com/egg/103153

Setup

Follow the setup instructions on: http://aqe.wickeddevice.com/?page_id=39

In summary setup is as simple as:
  1. Head to http://airqualityegg.com/ and enter the serial number on the AQE box
  2. Plug in the base station - watch for LED illumination sequence (green LED) to confirm successfully connection (or connect FTDI on baud 115200 for more verbose confirmation)  
  3. Pair sensor egg to base station by un-plugging the base station, then plugging it back-in then connecting the sensor egg when the base station glows yellow. Base egg will cycle through a number of colours to confirm pairing. 
  4. Deploy sensor egg somewhere in the open air (but undercover) within 100ft of the base
Base-egg LED colour status debugging from Wicked Device Blog
If your familiar with the Arduino IDE we recommend you 'crack-open' the base-station egg and connect the USB to UART cable (included) and open up an Arduino IDE terminal window (115200 baud) to view a verbose output of the setup process. Here's an example terminal output from a successfully connected egg:

Stack: 271
[Air Quality Egg - Base Egg - v1.03]
Unit Address: xx_xx_YOUR SERIAL NUMBER HERE_xx_xx
3070 Received Packet During Pairing
85 0 4 163 55 182 217 0
Pairing Event Count: 1
8159 Received Packet During Pairing
85 0 4 163 55 182 217 0
Pairing Event Count: 2
Pairing complete

Egg Serial #:  00:04:a3:37:b6:d9

IP: 192.168.1.102
GW: 192.168.1.254
DNS: 192.168.1.254
Stack: 191
SRV: 216.52.233.121
Previously provisioned
Packet Received @ 107604
  Packet Type: 33
  Remote Firmware Version: 3
  Remote Station Address: 00_04_A3_37_BB_97
  Source Sensor Address: 00_04_A3_37_BB_97
  Sensor Index: 0
  Sensor Type: Temperature
  Sensor Units: deg C
  Sensor Value: 11

Preparing stash
Sending data to Cosm
Data sent
>>> RESPONSE RECEIVED ---

Future Development

Wicked Device are actively developing the air quality sensors. Most recent is a dust-sensor add-on board.

We would love to make the Air Quality egg sensors more integrated into the OpenEnergyMonitor system, it would be cool to be able to add an air monitor sensor to an energy monitoring system using a Raspberry Pi with a RFM12Pi as the base station. 

The community crowd sourcing aspect of the AQE using Cosm as the data store has the obvious advantages of being able to easily share and compare air quality data (which is what the project is all about). However it would also be cool to get the data into emoncms for better graphing and analysis. I would love to see how the air quality date fluctuates over the days/months/year(s). 

Community / Troubleshooting / More info 

As always you are most welcome to post on the active and friendly OpenEnergyMonitor forums. However the Air Quality Egg is quite a new thing for us, more relevant support might be better obtained from:

Air Quality Egg forum: http://osqa.wickeddevice.com/

Google Group: https://groups.google.com/forum/?fromgroups#!forum/airqualityegg

Other Sources of Information: 

The Air Quality Egg is now available in the OpenEnergyMonitor shop, shipped from the UK to all Europe destinations


Power emonTx from single AC power supply - Part 2 bench testing


Back in May last year we did some work (with the help of Robert Wall and others) into the design of an AC-DC circuit to allow the emonTx to run off a single AC power adapter while at the same time taking accurate AC voltage samples to be used for Vrms, real power, frequency and power factor calculations. Read the original blog post detailing how the circuit works. Basicly, it's a half wave rectifier circuit with a carefully chosen value current limiting resistor. 

Just to recap, the challenge is powering the emonTx with 3.3V DC while not loading the AC adapter as to not effect the quality of the AC sine wave sample. An as close to perfect AC sample is desirable for best accuracy of real power readings, 

We have finally got round to testing the circuit we simulated using LT SPICE. In summary, results are positive, the circuit works as expected!

Here's what I did: the following circuit was built on a bread board, using an emonTx with the voltage regulator. The standard Ideal Power 9V AC-AC adapter from the shop was used for the test.

Scope trace showing input to voltage regulator
Half-wave rectifier circuit

A sketch was uploaded to the ATmega328 on the emonTx to cycle through a number of different power levels while using a scope to measure the sawtooth voltage waveform going into the MCP1702 voltage regulator. The following was recorded

Power State Current draw Vrms into MCP1702 Delta V into MCP1702 AC Voltage sample ripple
Sleep 25uA 16.4V 0V

ATmega328 only 7.7mA 12.7V 2.72V

ATmega328 + RFM12B 8.1mA 12.5V 2.8V

ATmega328 + LED 16.9mA 10.1V 5.5V

ATmega328 + LED + RFM12B 17.3mA 10V 5.53V Approx 80mV (limit of the scope)

The voltage limited zener diode was omitted from the test setup but will be present in the main circuit to avoid over volting the MCP1702 when supply is un-loaded.

The AC voltage sample will be taken when the emonTx is consuming 7.7mA (ATmega328 only running), the test has assured me that the circuit will be able to provide 3.3V DC without hardly any distortion to the AC waveform. There was only a 80mV ripple when drawing 17mA we can expect the ripple to be under half this when the emonTx is drawing 7.7mA.

It's interesting to note that the RMF12B (when idle, not sleeping) draws 0.4mA and the LED draws 9.2mA. The circuit is speed up to 20mA max so it would be possible to add one DS28B20 that will at maxim consume 2.3mA for short periods.

AC-DC circuit will be incorporated into the next version of the emonTx. Further testing will be done on this prototype to double check everything.

Roll on single power supply Real Power accurate energy monitoring. As well as being a neater setup it will also significantly reduce the carbon footprint and amount of electrical waste which will eventually go into landfill if we can enable the emonTx to only need the one plug-in power adapter. 


A big thank you to everyone


As you know OpenEnergyMonitor is a collaborative project. The project would be nothing without the hard work, time and effort that so many of you dedicate.

With the festive season upon us and the year coming to an end I would like to take this opportunity to say a big thank you to everyone who's contributed in some way to the project over the past year. Contributions could be anything from a whole new module, fixing a bug, correcting a typo to helping out with discussions and support on the forums. We very much appreciate every contribution no matter how small. 

Helping out with friendly support on the forums is an area where we are particularly grateful for assistance, as the project grows bigger (we're almost at 3000 registered users!) so does the user support requirements. It makes me very happy to see that the forums are a friendly place for new users to ask for help, as well as the first point of call for discussing an idea.

Here are a few names of people that I've picked up as making a significant contribution to the project over the past year. I apologise if I've missed anyone (I almost certainly have), if you think you too should be in this list please drop me and email and I'll add you on:

  • MrSharkey - Significant contribution into solar PV dump load controller design by investigating the characteristics of digital meters.
  • Everyone else who I've failed to mention... 
Thank you again and a Merry Christmas and a Happy New Year to all!

..no blog post is complete without an image, here's one a took a few weeks back. It rather sums up the winter we're currently having here in North Wales. Sadly rather wet and warm, rather than cold and icy. I suppose it's good news for heating energy! 

Water puddle reflections from a wet and windy North Wales, UK in December 


Tax and Season's Greetings...


...those are two words which are not often used together!

Since launching the OpenEnergyMonitor online-shop in March this year we have been busy shipping over 1300 order to 47 countries.

A big thank you to everyone who has helped support the project by purchasing items from the shop. Money raised will be used to fund future developments and the continued running of the project.  

Success has brought with it the administrative requirements of accounting and specifically tax accounting, As of November 2012 we are now a UK VAT registered partnership (our business name is Megni - which means energy monitoring in Welsh). Our prices in the shop now include VAT (currently 20%), we have managed to do this without increase our prices. Our invoices now  include our VAT number GB 152 7345 15. 

If you're are a VAT registered UK business – this is good news for you as you will be able to claim the VAT back on purchases from us.

If you're a VAT registered business outside the UK but in the EU – you can request a VAT refund from us on future orders

If you're a customer outside the EU- This is good news for you as sales to you will be zero VAT rated, you don't pay UK VAT but you will have to pay import TAX in your country. We will state the invoice total amount on the shipping documentation.

Please let us know if notice us making any mistakes with regard to how we issue invoices and price products with regard to VAT. We're only human and are learning all about this as we go along!

Merry Christmas and a Happy New Year to all.

Best wishes, 
Glyn Hudson and Trystan Lea

OpenEnergyMonitor Meetup

We had a very enjoyable OpenEnergyMonitor meetup last weekend. Ken Boak and Paul Allen (MarsFlyer)  came up from London, Matt Fawcett from Manchester and Carlos Alonso Gabizó from Machynlleth.

From left to right: Glyn, Matt, Ken
We did a surprising amount of development in such as short time as well having some great discussions. Here's a summary of what we worked on:

Controlling wireless nodes from emoncms
Ken Boak and I worked on furthering a way for emoncms to be able to send commands back to the gateway and wireless nodes, which could be used as part of a system for turning on and off heating systems and setting set point temperatures. There's now a new optional emoncms module called command where you can add commands to a queue that can then be requested by the gateway. Download the module here: https://github.com/emoncms/command


Gas monitoring 
There was a lot of discussion around gas monitoring. Paul brought with him a jeenode with a hall effect sensor connected for sensing the magnetic pulse given off by certain types of gas meter. The jeenode goes to sleep between pulses so that it can run on a single AA battery for a long time which is a big benefit for installations where there are no near electrical sockets. Glyn worked on adding this to the gas monitoring page on the website here: http://openenergymonitor.org/emon/buildingblocks/gas-meter-monitoring

Paul also implemented a pulse to power input processor for emoncms to allow conversion of pulse data coresponding to energy use increments to power values for use with the low power gas pulse counter.

EmonTx accuracy experiment replication
Carlos replicated the EmonTx accuracy experiment, with the results comparing well with the previous investigation take a look at his results here http://openenergymonitor.org/emon/emontx/accuracy


An open source SAP calculator - Matt and I made a start on an open source web based SAP worksheet - SAP is the UK Government’s Standard Assessment Procedure for Energy Rating of Dwellings produced by BRE the Building Research Establishment. We've put the progress we have made so far up on github here: https://github.com/emoncms/sap 
Please get in touch if your interested in helping to develop this, we could do with more help with completing the form and checking and implementing the remaining calculations.
Matt is working on a really exciting project in Manchester with Carbon Coop to do building retrofits of which monitoring and sap calculation is an important part, its well worth a look at their work here http://carbon.coop/


We also looked at humidity sensing and built up a couple of low-power wireless humidity nodes using an emonTx's with a DHT22 humidity sensor.

Throughout the weekend I think we had a good emphasis on how the tools that we are developing are applied with much discussion of how it all fits into the wider picture of sustainable energy. 

Finishing the first day with well earned homebrew ale thanks to Carlos
From left to right: Paul, Carlos, Matt, Ken, Trystan (Glyn taking the photo)
It was a great weekend and I'm really looking forward to the next one already, we're thinking maybe next April on a bank holiday weekend.

RFM12B Wireless Transmission Explained


All OpenEnergyMonitor hardware modules (emonTx, emonGLCD emonBase etc) currently use the RFM12B 433/868/915Mhz module to communicate via wireless. 

We use the JeeLib Arduino library from JeeLabs as the software driver for the RFM12B.

Robert Wall has recently contributed a well written bit of documentation to explain the basics RFM12B wireless transmission:


RFM12B - Part 2 -
Sending data by radio between emonTx, emonBase and emonGLCD
The data is sent by radio between the sensor nodes, the base station (including the RFM12Pi) and the display. This note describes the way in which the data is assembled and addressed in order to pass values between units.

The Arduino-based emon modules are programmed with application sketches that make use of the JeeLib library to handle the transmission and reception of the data, using the function calls provided by the library. The RFM12Pi is programmed in PHP but uses exactly the same methods and data structure. Appendix 1 contains instructions for configuring the Raspberry Pi module.


Configuring & Addressing
All the devices that communicate with each other must all use the same frequency. For the Arduino-based devices, this is specified in the software and must be one of the pre-defined constants. It must match the frequency of the hardware. (You should check which frequencies are permitted in your locality. It is possible to operate at the wrong frequency, e.g. 868 MHz hardware at 433 MHz, but the range can be very small, maybe less than 1 m).

The addressing scheme has two parts, the “Network Group” and the “Node ID”. The RFM12B module supports 250 network groups, the RFM12 module can have only one network group, 212. Only devices that belong to the same group can talk to and listen to each other. If you like, you can think of a network group as being like a room: everyone in the room can talk to anyone else, but can neither talk to nor hear someone in a different room.

Within the network group, there can be 31 Node Ids, but nodes 0 and 31 are special. Node 0 is used for On/Off Keying (OOK) and node 31 is for broadcast messages. The way we use it, each device must have its own unique ID. You can think of the ID as the name of a person in the room. Appendix 2 lists our standardised Node IDs.

There is one further but very important restriction: all the devices in all the network groups all use the same frequency, so only one device is allowed to transmit at any time.

This documentation forms part 2 of RFM12B documentation. Part 1 details an overview of the RFM12B module.

I would also like to take this opportunity to thank ukmoose for his contributions to the Raspberry Pi RFM12pi documentation wiki page.

Public and private feeds

Another new feature in the latest commit is what I hope is clearer feed authentication levels:

Public access to feeds - no authentication required accessible to everyone - these are for use in public dashboards which also require no authentication, but is wider than dashboards only as it also means sharing feed data publicly in general either directly through the feed api or visualisations.

Private feeds

Read only access to feeds - accessible via read apikey (but not public unless you share your read apikey publicly) useful for sharing with someone privately, ie sending a link via email to a trusted person. To do this you make the feed private and send the link to whatever it is you want to share privately with an &apikey=YOURREADAPIKEY at the end.

Write access to feeds - accessible via write apikey, strictly a private apikey (not to be shared as this would give others write access to your account). Write access is needed for connected devices such as the basestation to upload data to emoncms.

All feeds are by default private. To make a feed public click on the lock icon in the feed list, the globe icon represents public access:


This is my feed list, I have granted public access to my solar hot water system temperatures and made the house power private as this could be particularly sensitive data as it would be possible to see my daily activity in detail.

Private feeds and public dashboards

If you include a private feed in a public dashboard, the dashboard will not be able to retrieve the feed data and your dashboard is likely to look like this:


As all feeds with the implementation of this feature have been set to private all public dashboards will either have dials that are 0 and possibly visualisations that show the above message. If your visualisation is still working it may be because the javascript from the page is cached in your browser and you need to clear it.

If you see any bugs or to see the latest status of bug fixing and features on their way have a look at the bug and dev list


Multiple multigraphs

A long asked for feature for emoncms has been the ability to create multiple multigraph type visualisations. One might be a comparison of room temperatures another for hot water system temperatures, maybe another for room temperature and electrical or gas energy input?

This feature has now been implemented and is integrated fully into the visualisation selector page. If you have your own emoncms server you can download the latest emoncms from the usual place: github.com/emoncms/emoncms  and emoncms.org has also been updated.

Unfortunately due to the large rewrite of the multigraph code the new multigraph is not backwards compatible with the old multigraph, but I hope you will persist with the new implementation as the gains are well worth it. Old multigraphs appear as a list of undefined feeds, my advice is to delete the old multigraph and start with a new one.

Here is a brief walk through of the feature:

1) Start by going to the Vis tab and select the multigraph visualisation from the first drop down menu. In the second box you should now see a select multigraph drop down menu and a new + button. Click on the plus icon to create a new multigraph:


This will refresh the page, navigate again to multigraph in the first drop down menu, you should now see the new multigraph id in the drop down menu. Click/select the new dashboard id:


Select a feed from the add feed drop down menu and click on Add, this will add a feed to the multigraph feed list table. Put a tick in the left or right checkbox to specify the axis you wish the feed to appear on, you should now see the feed appear:


Add a few more, put a tick in the fill box to fill in the area below the curve:


Select a default time range by clicking on the day/week/month/year buttons. When you reload the multigraph it should now appear at the time range given. If you'd like the multigraph to load a specific fixed time range just zoom in on the area you want it to show, the next time you load the multigraph it should load your last view.


Add a multigraph to your dashboard by selecting multigraph from the dropdown visualisation menu. 
Click on the blank dashboard and click on the Options button. Select the multigraph you wish to show from the drop down menu and click save.

Love to hear any feedback on it, whether it worked or didn't work for you, may be worth clearing the cache if it does not work as a few of the javascript scripts have been updated. Enjoy!


OpenEnergyMonitor Shop Christmas Ordering

Looking up at Snowon 1085m from Llyn Glasyn yesterday (20 min north of OEM labs), North Wales UK

The first snow of the year has fallen onto the Welsh mountains and the emoncms Bee Hive Temperature Monitor has recorded sub-zero temperatures in the valleys. This can only mean that winter is on its way! 

The OpenEnergyMonitor online shop has been nice and busy recently; breaking the 1000th order mark a couple of weeks ago was a big milestone. Thank you to all of you who've ordered from the shop, you're directly helping to support the project. The success of the shop has enabled us to contribute to the project full time; we have lots of ideas for 2013. 

We will be running the shop and shipping orders as fast as we can right up until Christmas, if you're hoping to receive your items before Christmas we recommend you place your order before the following dates: 

UK:
1 st class: 18th Dec
Special Delivery: 20th Dec

Europe:
Airmail/Airsure: 10th Dec 

Outside Europe (USA):
Airmail/Airsure: 8th Dec 

Outside Europe (NZ/Australia):
Airmail/Airsure: 3rd Dec

If you don't manage to get your order in before the dates above, don't worry there is still a good chance it will arrive, we will be shipping as fast as we can right up until our local post office shuts on 23rd Dec.  

Merry Christmas or as we say in Welsh Nadolig Llawen.


The view from Plas Y Brenin early this morning looking out over Llyn Mymbur  (30 min north of OEM labs), North Wales UK


OpenEnergyMonitor meetup

Were having an openenergymonitor meetup, hack weekend the weekend after next (8th-9th of December) up here at the openenergymonitor lab in Snowdonia, North Wales. This is an open invitation, if you have the weekend free (I appreciate the short notice) and would like to come please send me an email: trystan.lea at openenergymonitor.org It will be a fairly low key event with plenty of building, coding, chatting, probably a pub visit and enjoying the mountain air.

For a taste of what its like have a look at the blog posts for the last meetup we had:

http://openenergymonitor.blogspot.co.uk/2011/05/snowdonia-build-april-2011.html

And the video of a day at openenergymonitor:


Here's the location:


View Larger Map

If your interested please get in touch.

Hope to see you there!

Trystan