Blog
OpenEnergyMonitor

AA Battery Considerations

The manufacture of batteries is a very energy intensive process often using many types of heavy metals, it makes total sense to use rechargeable batteries where possible and always recycle old batteries. When it comes to low power sensing nodes I’m as guilty as anyone else when it comes to just sticking in some cheap alkaline batteries, always believing that the performance of rechargeable batteries was much lower. This is not the case anymore.

If rechargeable batteries are used (which they should be) the self-discharge rate can be significant. The self-discharge rate of NiMH batteries is high: around 30% per month at room temperature. This problem can be almost eliminated by using low-self discharge NiMH cells such as Eneloop, they have a discharge rate of about 5% per year. If non-rechargeable alkaline batteries are used they have a self-discharge rate of less than 2% per year.
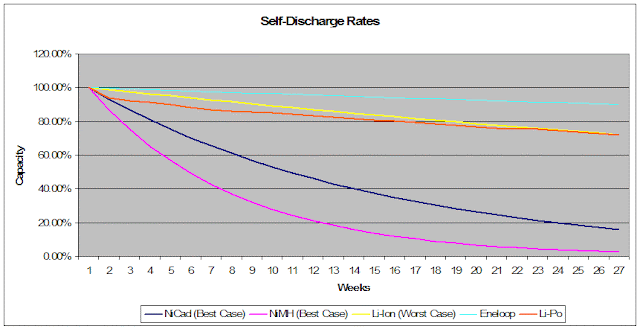
Rechargable batteries self-discharge graph from batterydata.com

If you care about the environment (which we all should do) we highly recommend the use of Sanyo Eneloop rechargeable AA’s in the emonTH and emonTx. They are a bit more expensive (about £2 each) but over their lifetime (they can be recharged 2100 times!) they will work out cheaper. The Eneloop cells are cadmium free and arrive fully charged and ready to use. Sanyo states that this charge is supplied by their solar PV system in Japan!

An excellent setup (as recommended by JCW of JeeLabs.org) is a spare set of Eneloop AA’s (Apple AA’s are rebranded Eneloops) permanently plugged in an Apple AA charger which he measured using 0W when the batteries are fully charged! This way you always have a set ready to go: http://jeelabs.org/2010/08/19/new-aa-battery-option/

Update: I’ve just discovered iGogreen’s Alkaline Rechargeable batteries which claim to hold their charge for 7 years and contain no heavy metals : Mercury, Cadmium, Lead or Nickel. They do fall down for high power draw applications but this is not an issue here, maybe a perfect match for long term low power nodes? They are also cheaper than Eneloops. The only draw back is they they need a special charger, iGo do a reasonably priced nice looking USB charger which will also charge standard NiMH

Update #2: The iGoGreen rechargable alkaline AA’s tended to leak acid after a couple of years. I would not recomend. They seem to have now been discontinued


CarbonCoop & OpenEnergyMonitor build weekend, November 16 & 17th

After much re-arranging we've got the new date for the energy monitoring build weekend that we're hosting with Carbon Coop at MadLab in Manchester. Its now on the 16th and 17th of November.

Meetup page:
http://www.meetup.com/Eco-Home-Lab-Manchester/events/140046162/ 

As before there will be three main parts to the weekend:

Build an OpenEnergyMonitor system (Saturday 10AM - 6PM + Completion on Sunday if needed)


This is a chance to build a monitoring system with the support of others who have built systems before, Matt Fawcett and I will be on hand to help, we will walk through building the emontx energy monitoring sensor node and how to setup a raspberrypi basestation running emoncms.

With this you can explore and track changes in home electricity use over time via a web dashboard.


If you've already got an OpenEnergyMonitor system but need some help getting it to work your also welcome to attend this workshop, please bring your monitor along.

To complete the build you will need:

Emontx 868Mhz
Programmer - USB to serial UART
Mini USB cable
USB power adapter
• AC-AC Adapter - AC voltage sensor
Raspberry Pi - model B
RFM12Pi Raspberry Pi Expansion board kit 868Mhz
Micro USB Cable
USB Power supply for RaspberryPI
• Sandisk SD card for the Raspberrypi
• 1 mtr cat-5 cable

The total build price if you get everything from the OpenEnergyMonitor shop is £121.5 inc VAT.

If you already have a raspberry pi and spare USB Power supplies, micro and mini USB cables (they often come with newer mobile phones) you can do the whole build for £68.50.

There will be a limited number of these kits available on the day (at the same cost), to make sure you can build please order these beforehand.

Put a note in your order message that you need the kits for the weekend so that we can make sure you have them.

If you want to read-up on the build guides and learn more about the system before the event take a look here:

http://openenergymonitor.org/emon/guide

Show and tell
 
Were excited that Robin Emley will be joining us to demonstrate his Solar PV Diverter on the Saturday: 
http://openenergymonitor.org/emon/mk2

If youd like to come and show what you've been working on around open source monitoring and control please do, get in contact to let us know if you are coming.

Hackathon

There will be a table dedicated to just developing something new, hardware or software. For example editing or amending the monitor's online display dashboards or improving energy modelling tools such as OpenSAP.

Sign up on the meetup page
Please add your name to the meetup page if your coming so that we have an idea about numbers and let us know how much of the kit you want for the build as above.
http://www.meetup.com/Eco-Home-Lab-Manchester/events/140046162/

We look forward to seeing you there! please get in contact if you have any questions:

[email protected] or [email protected]

Website Backup

In the interest of open-source I thought I would share the backup setup we have running for the OpenEnergyMonitor website. I'm relatively new to sys-admin tasks and writing bash scripts so please suggest if you think if something could be implemented better.

Backing up our Drupal SQL databases which contain the user credentials and all the forum and text content of the website was relatively easy since the disk space they take up is relatively small. A nightly SQL dump then a scheduled secure FTP bash script running as a nightly cronjob on a Raspberry Pi with external hard drive to download the zipped SQL database does the trick. The FTP login credentials are stored away from prying eyes in .netrc file (with chmod 600), two sets of credentials are required and the relevant .netrc file is copied to the home folder when needed.

cp netrc/.netrc1 .netrc
today=$(date +"%d-%b-%Y")
ftp -vp -z secure $HOST << EOT
ascii
cd /LOCATION OF SQL DUMP ON SERVER
get $db_name-$today_backup.gz $LOCAL_BACKUP/$db_name-$today_backup.gz
bye
EOT
rm .netrc


 Backing up the files (images, documents etc) is a bit more of an issue since the ever increasing size of the content mean it's impractical and would unnecessary load the server and bandwidth to download a full snapshot every night.

I found wget has many customisable options. A nightly scheduled bash script running on a Raspberry Pi with an external hard drive with the following wget options looks at files have been created or modified since the last time the command was run and only downloads the changes. Once the initial download is done the command only takes less then a minute to execute and often only downloads a few Mb of data. The option '-N' tells wget only to download new or modified files

cp netrc/.netrc2 .netrc
wget -m -nv -N -l 0 -P $LOCAL_BACKUP ftp://$HOST/public_html/FILES_LOCATION -o $LOCAL_BACKUP/filelog=$today.txt
rm .netrc
# This is what the other options do:
# -l 0 infinite level of recursive (folder depth)
# -m mirror
# -N only download new files
# -o logfile
# -b run in the background
# -q turn off logs
# -nv non-verbose logs
This setup seems to be working well. It has a few weak points and limitations that I can think of:
  • The wget files backup script only downloads new and modified files, it does not mirror the fact that a file could have been deleted on the server, the file would remain in the backup. 
  • The wget script does not keep historical snapshots meaning that if something bad was to happen it would not be possible to rollback to a certain date in history. Update: I have since had recommend to me Rsnapshot which is a backup utility based on Rsync. Rsnapshot looks great and can work over FTPS. My friend Ryan Brooks wrote a good blog post on how to set up Rsnapshot over FTPS
  • Currently the Raspberry Pi only has the one external 1TB hard drive used for backup, ideally this would be two hard drives in a raid array for double safety Backups are only done nightly, this is plenty good enough for us at the moment but might need to be improved in the future. 

I think it's amazing that a little £25 Raspberry Pi is powerful enough to handle backup for several websites. the Pi with an external 1TB hard drive connected through a USB hub consumes only 5.7W making it not too bad to leave on 24/7.

 One issue that I had initially with the Pi is that the external hard driver would move from /dev/sdb to /dev/sdc therefore loosing it's mount point. I think this was caused by the HDD momentarily losing power. Switching to using a Pimoroni PiHub to power the setup and mounting the drive by it's UUID instead of /dev/xxx reference in fstab fixed the problem: 

UUID=2921-FCE8 /home/pi/1TB vfat  user,umask=0000   0   0

I would be interested to hear if you think how the backup could be implemented more efficiently or more securely.

Backing up your raspberrypi emoncms or emoncms.org account

I've added a couple of scripts to the emoncms usefulscripts directory that makes backing up an emoncms account whether on a local raspberrypi or emoncms.org much easier than the sync module solution, although still not as easy as I would like it to be, I would like setting up a backup to be as easy as installing a dropbox client. 

The scripts work with Linux at the moment, hopefully soon I'l get a solution running on Windows. I would highly recommend keeping your own backup of your data, a backup of your emoncms data on your main computer can also be useful for both quicker access to the data and doing additional analysis of the data.
1) Install emoncms on your backup machine following the guide here: http://emoncms.org/site/docs/installlinux
Create an account and note down your mysql credentials.

2) Download the usefulscripts repository
https://github.com/emoncms/usefulscripts

There are two scripts available under usefulscripts/replication

  • import_full.php
  • import_inputs.php

3) Try importing your inputs first to test that it works: Open to edit import_inputs.php.
Set your mysql database name, username and password, the same credentials as for the settings.php step of the emoncms installation. Set the $server variable to the location of the raspberrypi or emoncms.org account you want to backup and set the $apikey to the write apikey of that account.

In terminal, goto the usefulscripts/replication directory. Run import_inputs.php:

    php import_inputs.php

If successful you should now see your input list and all input processing information backed up in your local emoncms account.

4) Backup all your feed data:

As for importing inputs open import_full.php and set the database credentials and remote emoncms account details.

Run the backup script with sudo

    sudo php import_full.php

That's it, it should now work through all your feeds whether mysql or timestore (no phptimeseries support yet) making a local backup. When you first run this script it can take a long time. When you run this script again it will only download the most recent data and so will complete much faster. I run this script once every few days to keep an up-to-date backup.

RaspberryPI: SD Cards, HDD, Gateway Forwarder

After several Raspberry Pi emonBase SD card failures between myself and Glyn in the last two weeks and the general experience of short SD card lifespan on the forums (SD cards have a limited number of writes), we thought we'd make a concerted effort this week to move the openenergymonitor Raspberry Pi documentation, pi images and pre-installed SD cards over to the more stable solutions:

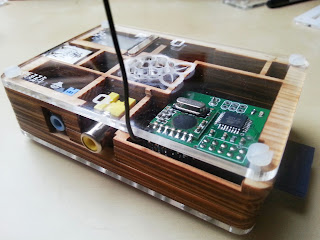
Raspberry Pi emonBase with RFM12Pi in Pibow Timber Case

1. We read Martin Harizanov's blog post on creating a rock-solid gateway using a read-only filesystem with Jerome Lafréchoux's excellent python oem_gateway to forward data to emoncms.org

This is a reliable solution which is simple to setup and works well if you just want to forward data to a remote emoncms server like emoncms.org. We have created a Raspberry Pi SD card image for this read-only filesystem oem_gateway setup, see documentation page for full details, there's a link to download it there too:


The ready-to-go pre-loaded SD card available in the shop will be pre-loaded with this image from now on. 

2. We also heard from Paul Reed about his setup where the SD card is just used to boot an external hard drive (powered by a USB hub) with the Pi's root partition running a web server and the full version of emoncms on the external hard drive. This solution is great if you want to keep your data locally or have an additional backup. This could also double up as a 24/7 file server running in your home for music streaming, document backup etc.

Glyn's using the read-only gateway for his setup and I'm going to setup the hard drive local backup in addition to forwarding to emoncms.org for mine.

Here's a diagram that illustrates these different options, including the NanodeRF, local and remote storage, backup options and emoncms data storage options (mysql, timestore etc):
If your not sure which way to go, its probably easiest to start with the Raspberry Pi oem_gateway forwarder to emoncms.org, you can re-configure it for local storage and backup via an external harddrive if you want later. If your more comfortable with Arduino code than the Raspberry Pi and linux then the NanodeRF (pre-assembled SMT) may be best for you.

To summarise the above with pros and cons, here are the two main emonBase Raspberry Pi options:

1. Run a read only filesystem on the Pi and forward data straight to a remote emoncms server.
Developed by Jerome Lafréchoux and Martin Harizanov's
http://harizanov.com/2013/08/rock-solid-rfm2pi-gateway-solution/
  • + More robust and easier to setup
  • + Cheaper and lower power than using an external HDD
  • - Does not utilise the full potential of the Pi
  • Run IPE – Industrial Perennial Environment a special blackout-proof flavour of Raspbian which can be locked down after setup to work in read only mode
  • The Oem Gateway Python script by Jérôme Lafréchoux to forward the data received by the RFM12Pi straight to emoncms.org
2. Move the Pi's file system to an external HDD using the SD card only to boot 
This option requires an external hard drive connected to the Pi through a powered USB hub. This does require extra expense and an increase in power consumption, the hard drive we tested here a 1TB USB hard drive adds 1.8W to the power consumption of the Pi (3.9W). However this option does have several advantages:
  • + Ability to run emoncms on the Pi to log data locally and have full control over your setup as well as forwarding data to a remote emoncms server.
  • + You now have the potential to have 24/7 file server running in your house for music streaming document backup etc.
  • - More complicated to setup
  • - Higher cost and power consumption

Measuring building thermal performance - coheating tests

Improving the thermal performance of buildings is an area where some of the largest energy and carbon savings can be made. Building energy use and carbon emissions can be reduced by as much as 60-80% through better insulation, draught proofing (improved thermal performance) and heating efficiency and controls. But how do you go about working out the performance of your house and what measures are best to undertake to reach this level of performance improvement? Improving building fabric is expensive, how do you work out which measures will be most cost-effective? and how do you make sure that your house actually achieves the target performance? how do you measure and check it?

These are the questions I’m currently grappling with for my own house and the openenergymonitor lab, these are also the questions we’re trying to develop improved processes for answering with our work with Carbon Coop.

Here’s a graphic from the Centre for Alternative Technology’s Zero Carbon Report illustrating the kind of performance improvements that are possible:


The most common way to investigate domestic building performance is by using simple building energy models such as SAP:
http://openenergymonitor.blogspot.co.uk/2013/06/building-energy-modelling-carbon-coop.html

The accuracy of a model is always dependent on its input data and assumptions, work that has been done on comparing modelled energy consumption as calculated by SAP vs actual energy consumption show that there is often a discrepancy and in some cases the discrepancy is so large (even a 100% or more) as to undermine decisions made based on model outputs.

https://www.bsria.co.uk/download/asset/agm-2011-co-heating-tests-sarah-birchall.pdf
To rely therefore on modelled performance only can be misleading.

It is possible however to measure the total building thermal performance by measuring how much energy it takes to heat a building up to a given temperature above the outside temperature. This procedure is known as a coheating test and was pioneered by the Center for the Built Environment at Leeds Met University. (There's also a good info sheet on coheating tests here by Peter Warm www.peterwarm.co.uk/?dl_id=6 )

The standard co-heating test involves heating building when unoccupied to an elevated internal temperature of 25C over a period of 1-3 weeks with electric heating and monitoring the electrical heat input, internal and external temperatures. Keeping the building unoccupied reduces unknown variables and so increases the accuracy of the measurement but it alongside the elevated temperature makes widespread testing of this kind difficult.

The question that several people have been asking and I’m aware of several groups working on this (@Housahedron and Richard Jack, lboro) is; can a method be developed for undertaking an ongoing co-heating equivalent test that can be undertaken while the building is being used, that could even measure thermal performance over time as measures are undertaken. The analogy is a car MPG meter but for your house.

Over the last few weeks I’ve been working on an approach that I think is showing promising results, it involves applying a dynamic model to realtime monitored heating input and external temperature data to model indoor temperature. The modelled internal temperature is then compared to the actual indoor temperature.


The model parameters that give a good match tell you the heat loss factor of your building and also it’s thermal mass. The heat loss factor is your MPG equivalent for household fabric thermal performance.

The model type is a multi stage resistor-capacitor model, using the resistor-capacitor analogy for thermal modelling is a standard approach used in many thermal models, there's an interesting page on it here: http://lpsa.swarthmore.edu/Systems/Thermal/SysThermalModel.html


This is all open source and the code so far is up on github here: https://github.com/emoncms/openbem,
There's also a forum thread here with a bit more information on the model and tests http://openenergymonitor.org/emon/node/2783

Faire Maus! A 'fair' USB optical mouse

A few weeks ago I wrote a blog post about ethical and sustainable electronics.

In the post I mentioned a German project called Nager IT who have designed an optical USB mouse using low carbon materials and have gone to great lengths to source ethically produced components with a transparent supply chain and exploitation free manufacture.

We have decided to support the Nager IT project by becoming a UK reseller of their 'Faire Maus' or fair mouse. This mouse is as good as it gets at the moment in terms of ethical and sustainable electronics.

The mouse is a well-made three-button USB optical scroll wheel mouse made using low carbon materials, ethically produced components with a transparent supply chain and exploitation free manufacture.

The mouse is now available for purchase on a non profit basis (for us) in our shop: http://shop.openenergymonitor.com/fair-usb-optical-mouse/


The mice are assembled by hand in Germany and feel very well made, the texture of the wood plastic enclosure feels good in the hand and the sleek and rubbery USB cable runs smoothy over the table.


Every time I use the mouse it it reminds me that ethical and sustainable electronics is a goal which is worth pursuing.

Purchasing a fair mouse can be thought of like purchasing fair trade coffee; it might cost a little bit extra but you know that your doing good.

Checkout the great graphic Nager IT have produced illustrating their transparent supply chain behind this mouse.


Posting data from Adafruit Tweet-A-Watt to emoncms

Tweet-a-watt is a project from Ladyada / Adafruit to modify a Kill-A-Watt appliance power monitor to transmit the power data via Xbee to a computer (could be a Raspberry Pi) and post the value to twitter. Chris Whiting has modified the python code to post the data to emoncms


Chris Whiting writes: 

A Tweet-A-Watt is plugged into an outlet with a device plugged into it. A xbee is wired to the Kill-A-Watt electronics, which reads an analog voltage representing the power and current being used by the device plugged into the Kill-A-Watt. The xbee sends the data to a receiving xbee which is plugged into a computer using an USB FTDI TTL-232 cable.

I have a script called "wattcher.py" running on a Raspberry Pi which was originally developed by the folks at Adafruit. This script reads the data sent to the receiving xbee through the serial port. The script takes the raw data and processes the data to calculate the power being used. I modified the script to send the collected data to a web socket. The receiving web socket is the oem_gateway.py script that's running on my web server where Emoncms is currently installed.

Chris has kindly put his cod on GitHub for everyone to try: https://github.com/casestudies/tweetawatt


emonTx V3 Progress Update

Since my last post introducing the emonTx V3  prototype design progress has been steady. The design has undergone several iterations and has now reached a stage of maturity.

The main features of the emonTx V3 have stayed the same:
  • ATmega328 Arduino IDE compatible microcontroller
  • RFM12B or Ciseco SRF 433/868/915Mhz RF wireless compatiable with RFM12Pi Raspberry Pi emoncms basestation
  • 3 x Standard (23kW max) CT channels
  • 1 x High sensitivity (4.5kW max) CT channel 
  • Integrated AC-DC power supply to enable powering the unit from a single 9V AC adapter while also sampling the AC voltage to calculate Real Power and AC Vrms readings 
  • Low power design with option to power from 3 x AA batteries for Apparent Power (current ony) measurement
  • Enclosed in wall mountable extruded aluminium enclosure
  • Terminal block connection for optical pulse sensor and DS18B20 temperature sensors
  • Pre-assembled SMT electronics
emonTx V3 with 3 x AA battery's and 1 x CT (Apparent Power setup)
Fully assembled with antenna in wall-mount enclosure

I am currently in the process of obtaining assembly quotes from manufactures as well as performing lots of testing.

emonTx V3.1 PCB Design 
emonTx V3.1 Schematic

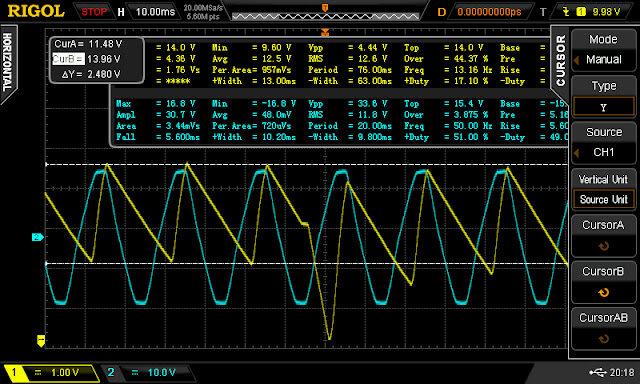
The AC-DC circuit that was initially designed with the aid of simulation then bench tested is performing as expected.

Blue = output from 9V AC adapter Yellow = input to voltage regulator when unit is drawing 7.7mA  @ 3.3V, sudden dip is caused by RFM12B firing up to transmit four integer data packets (approx 24mA for 2.7ms)
If all goes well we're expecting to get the emonTx V3 into production in the next few of months.


emonGLCD 433 / 868 Mhz RF Scanner & Signal Strength Meter

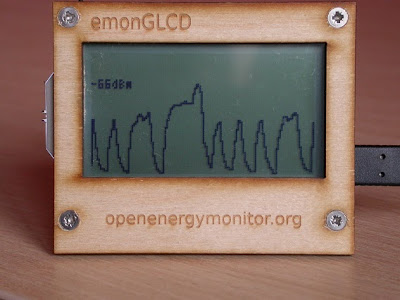
Martin Roberts has developed a fantastic bit of firmware for the emonGLCD to enable it to be used as an RF scanner and signal strength meter on the 433 / 868 Mhz RF band.

 This makes the emonGLCD running this firmware a useful tool for debugging RF transmission and checking out signal strength. To run the firmware a small hardware modification is required to the emonGLCD to access the analogue signal strength output signal from the RFM12B.

Martin's sketch has been added to the emonGLCD github repo.

Full details including build-guide and discussion can be found on the original forum thread.