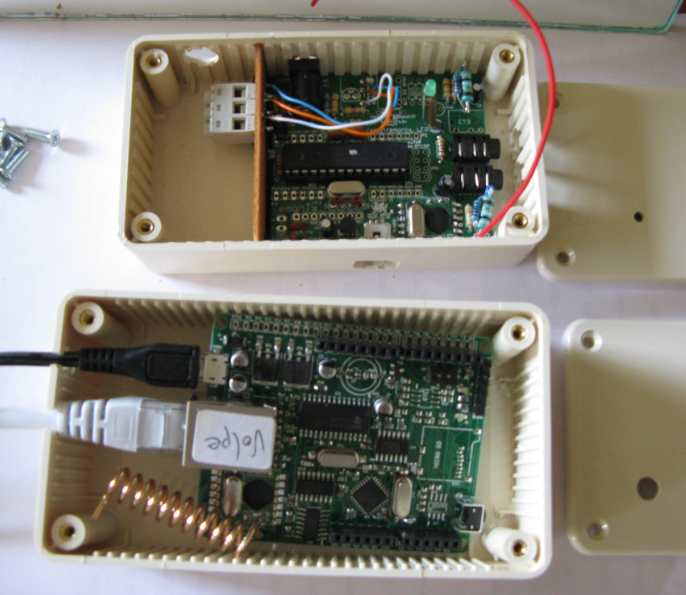
on the Hope RF RFM12B power consumption I decided to do a comparison with the Ciseco
. An
(miniature ATmega328 in XBEE footprint) was used to mount and interface with the two radios. The same 3.3V power supply was used with both modules
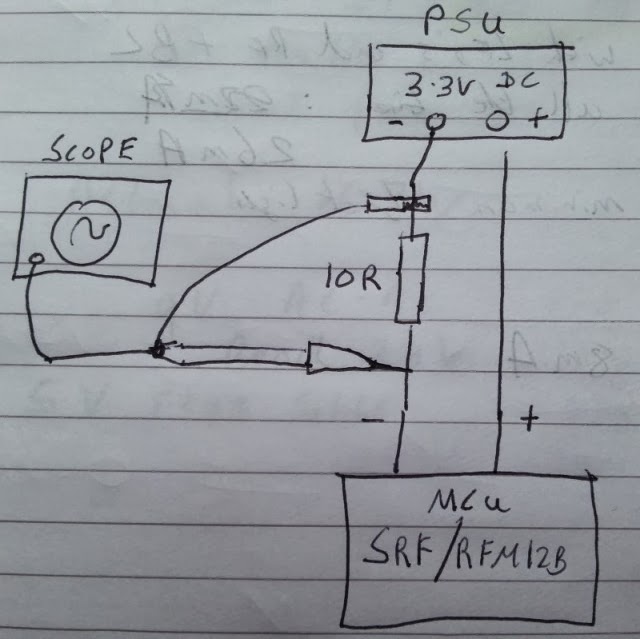
The scope was connected up to measure the voltage drop across a shunt resistor as follows:
Hope RF RFM12B
Here is the RFM12B current consumption trace while sending 4 integers using the JeeLib packet structure. Using this packet structure each integer takes up 2 bytes, therefore 4 integers is 8 bytes plus 1 byte containing the node ID, this gives a total packet size of 9 bytes. Transmission takes 2.7ms and the current consumption in the time is about 24mA @ 3.3V. This gives a power and energy consumption of 24mA * 3.3V = 79.2mW * 2.7mS = 0.214mJ = 214uJ
Ciseco SRF
A SRF V1.0a with serial firmware was used for this test.
The SRF is serial based. Ciseco have standardized on a communication structure called
LLAP (Lightweight Local Automation Protocol).
A LLAP packet consists of one start byte 'a' , two bytes for the node ID then 9 bytes for the message. Encoding as HEX each LLAP packet can give us space for two integers. Each integer has a range of -32767 to 32767 which is fine for our standard emonTx setup which has a maximum reading of 25000W (100A x 250Vrms).
To transmit four integers from the emonTx (3 x power and 1 x voltage) would require two LLAP packets which each contains 12 char characters which gives a packet size of 12 bytes transmitted twice giving a total of 24 bytes.
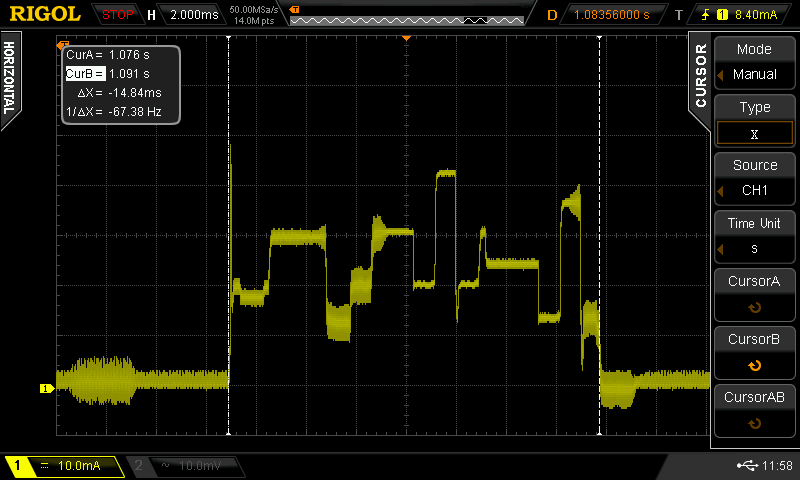
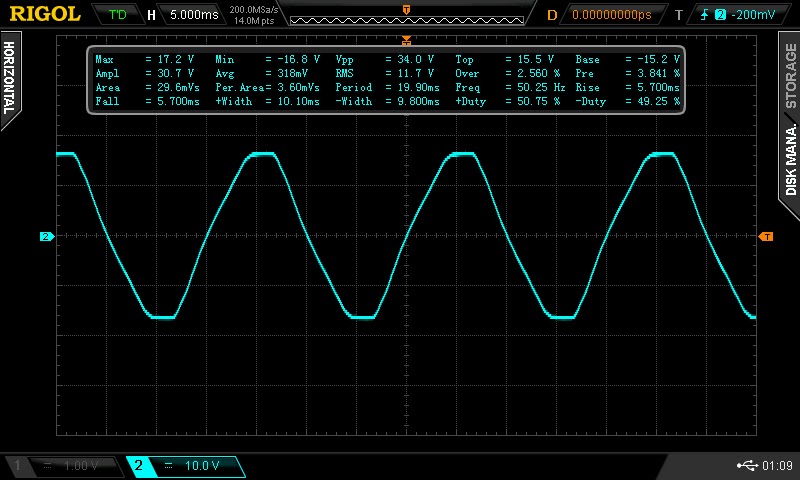
Here is a current capture waveform of the SRF transmitting two LLAP packets, it's rather more interesting than the RFM12B, I would love to know exactly what the SRF is doing at each spike and dip.
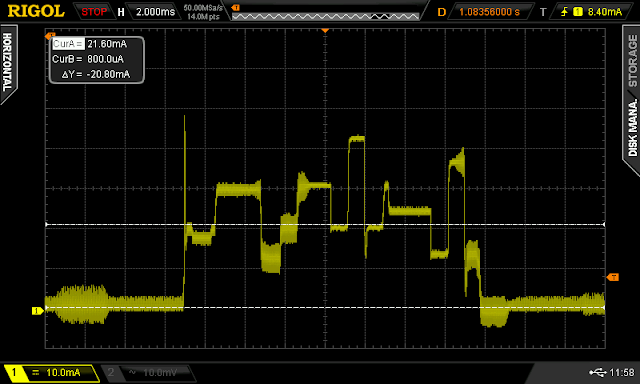 |
| Average power consumption of 20.8mA |
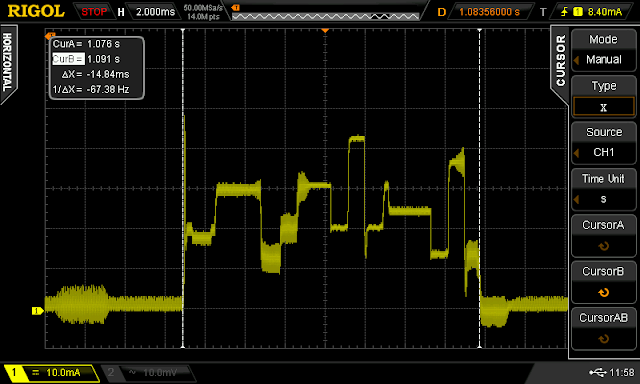 |
| Transmission of two LLAP packets takes 15ms |
Transmission of two LLAP packets takes 15ms with an average current of consumption of 20.8mA. This gives and power and energy consumption of 20.8mA * 3.3V = 68.6mW * 15ms =1mJ.
This is 4.7 times more energy than the RFM1B for the transmission of the same four integers. This is mainly due to the efficient nature of the JeeLib packet structure sending the integers as binary rather than serial characters as in the case of the SRF. Transmitting four integers as HEX characters in two LLAP packets takes 24 bytes as opposed to the 9 bytes needed for the same four integers in the RFM12B JeeLib packet structure. Taking this into account the SRF consumes 41uJ per byte where the RFM12B consumes 23uJ per byte, this is around 1.8 times more power byte for byte than the RFM12B.
 |
| SRF startup 50mA spike |
An interesting observation is that the SRF exhibits a rather high current spike of about 50mA as it's turned on / comes out of sleep. As this spike only lasts for only about 100nS it won't contribute that much to the overall power consumption.
Energy Consumed While Sleeping
The energy used the the RF modules needs to be put in perspective with the overall consumption of the system. An emonTx running on batteries or low power temperate node will spend much of it's time sleeping, the ATmega328 consumes 4.3uA when sleeping and the SRF and RFM12B consume about the same when sleeping 0.2-0.3uA, giving an overall sleep mode power draw of 4.6uA or 0.0046mA.
Sleeping for 10s
Assuming a the case of a wireless node which sleeps for 10s in between readings. This gives a energy consumption of 0.0046mA * 3.3V = 0.0152mW * 10s = 0.152mJ = 152uJ.
If this node was using an RFM1B 1.4 times more energy would be consumed in the 3ms that the RFM12B is active while transmitting the data via RF then in the proceeding 10s when the node is sleeping
If the temperature node was using an SRF 6.6 times more energy would be consumed in the 15ms that the SRF is active while transmitting the data via RF then in the proceeding 10s when the node is sleeping.
Sleeping for 10 min
Assuming a the case of a wireless node which sleeps for 10s in between readings. This gives a energy consumption of 0.0046mA * 3.3V = 0.0152mW * (60s *10) = 9.13mJ.
The energy consumed while sleeping now becomes the greatest consumer. The energy consumed during sleeping for 10s is 43 times greater than the energy required by the RFM12B to transmit the data or 9 times greater than the energy required by the SRF to transmit the data.
Conclusion
If a ATmega328 based 'sleepy' node sleeps for 14s or more the energy used during sleeping will equal or greater the energy used by the RFM12B (to transmit four integers). If the nodes sleeps for 1 min or more the energy used during sleeping will equal or greater then energy used by the SRF (using serial LLAP to transmit four integers).
LLAP serial on the SRF not the most power efficient way to transmit integers compared to the RFM12B using the JeeLib packet structure. Power consumption of the SRF can be reduced at the expense of human readability of the data packets. I plan to investigate this further, see questions to answer below:
Questions to answer:
Does the extra energy consumed by the SRF result in increased range over the RFM1B?
The SRF by default is set at 10dBm transmission power (compared to 0dBM for RFM12B), this can be reduced all the way down to -30dBm in various increments, how much will this reduce energy consumption and range? Is there a sweet spot? The RFM12B transmits at 0dBm, how will the range of the SRF transmitting at 0dBM compare to the SRF?
The SRF currently transmits at 9600 baud rate, this can be increased to 115200, will this reduce the time taken to complete a transmission and therefore energy used. How much will this effect loss of packets and range?
Ciseco SRF setup documentation. Is it possible to interface directly with the SRF to transmit the raw packets not using serial?
Can power consumption of SRF be improved with new firmware?
I hear it's possible to use the CC chip on the SRF to offload the WDT to wake up the ATmega328 using a hardware interrupt, this could result in sleep current draw of around 0.3uA. I'm keen to investigate this.


