Blog
OpenEnergyMonitor

Measurement of heat loss in a hot water cylinder

Carrying on from the last blog post about measuring heat flux in and out of a hot water cylinder.

Heat loss from a hot water cylinder should be proportional to the temperature differential between the inside and the outside of the cylinder by a constant: Watts of heat loss per kelvin. See heat conductivity.

Watts of heat loss can be calculated from the temperature reduction per unit time of the average cylinder temperature. If we plot heat loss against average cylinder temperature we should get a linear relationship where the slope of the line of best fit is the heat loss factor, see graph 2 below.

This constant the heat loss factor for a particular cylinder is a useful measure in evaluating the performance of a cylinder.

My hot water is heated with a 3kW electric immersion heater. I wanted to know how much heat would be lost if I leave the immersion heater on all the time at a given temperature and so how much energy I could save by only putting the immersion heater on specifically when its needed i.e for a bath in the evening.

The results

I have selected a period of time here where both hot water and the immersion heater where not used. Leaving only solar hot water heat input and heat loss from the cylinder as the only drivers of the system. The solar hot water coil is in the bottom of the cylinder which heat's the cylinder relatively evenly compared with the immersion heater making it ideal for this test. I have filtered out all positive heat gain so that we can see the heat loss clearly:


Conclusion

The conclusion is that we are saving about 1.6 kWh/d from reduced heat loss (30C temperature difference over 23 hours), which is a good saving from something relatively easy to do. It may be that we are saving more than this from reduced hot water demand in the first place by not having hot water on tap all day but this is another thing to test.

If your monitoring hot water cylinder temperature It would be great to see how these figures compare.

Download the source code: heatloss.zip

Measuring heat flux in and out of a hot water cylinder

The heat input into a solar hot water cylinder is usually measured using a flow meter and two temperature sensors. Flow meters are quite expensive and require plumbing work to install. At OpenEnergyMonitor we're all for non-invasive monitoring methods! So..

Can the heat flux in and out of a hot water cylinder (a fixed volume of water) be approximately calculated by measuring the average temperature change in the cylinder in kelvin per second and then multiplying by the volume of the cylinder and the specific heat of water?

This method may only require two temperature sensors so will be considerably easier and more affordable than installing a flow meter.

I've used an emonTx with two DS18B20 temperature sensors one positioned in the temperature sensor sleeve that is in the bottom half of the cylinder and the other positioned in the temperature sensor sleeve in the top half of the cylinder. The emontx is also monitoring the solar hot water collector temperature, controlling the solar hot water system and monitoring house electric consumption and solar pv electricity generation :)

Calculating heat flux
Heat Flux (Watts J/s) = Specific heat of Water (4186 J/kg/K) x Volume of cylinder (Litres) 
x temperature change per second (K/s)
The result
The heat flux is the blue plot and average cylinder temperature is the red plot. I have selected a period of time where the electric immersion heater is on. Feel free to explore the data by using the zoom and pan buttons.

I'm surprised by how good the initial results seem to be. I know that the electric immersion heater consumes about 3400W from my electricity monitoring and the heat flow input calculated via the above method gives pretty much the same power input plus or minus a few hundred watts or so.

Questions for further development
What is the minimum number of temperature sensors needed and what are their optimum positions to give best results? What is the effect of stratification?

Download the source code: hotwatercylinder.zip


Emoncms multilingual support

The latest update to emoncms adds a basic implementation of multilingual support.
https://github.com/openenergymonitor/emoncms3

Adding a language

1) Make a copy of the folder Views/en and call it the language your creating a translation for, i.e cy for welsh:


.. or use a language that has already been translated from the emoncms_languages repo, i.e cy...
https://github.com/openenergymonitor/emoncms_languages (feel free to send a pull request with your translations)

2) If your creating a new translation, translate each view script inside your language folder.

3) Add your language to the language options in index.php:

Change the line:
$lang =  $_GET['lang']; if ($lang=='en') $_SESSION['lang'] = $lang; else $lang = null;

to (with your chosen language code)
$lang =  $_GET['lang']; if ($lang=='en' || $lang=='cy') $_SESSION['lang'] = $lang; else $lang = null;

2) Add your language to the user_view language selector.
Until a better implementation is created, this needs to be done for each language.
In Views/en/user_view.php

add (or your chosen language)

<option value="cy">Welsh</option>

below:
<option selected value="en">English</option>


Repeat this for the user_view that belongs to the language your adding and set the selected attribute to the added language.

Any thoughts on a better way of implementing this is as always welcome.

emonGLCD Solar PV PWM LED Proportional Indication

The tri-colour LED's on the emonGLCD V1.3 are connected the the hardware digital PWM lines on the Atmega328. This allows the brightness to be smoothly controlled in 0-255 steps.

Up-until now we have not made use of this feature.

The video below shows a demo of Solar PV generation and power consumption ramping up and down. The tri-colour LEDs smoothly increase in intensity green or red depending on the amount of power being imported or exported.

This should serve as a nice at-a-glance visual indicator to how much power is being imported or exported at any given time. At the moment the example has been configured so that the LED's are at their brightest when 4kW's are being exported or imported. In the future it would be great if the display learnt what size PV system (kWp) is installed.


It would be possible to implement a similar feature on the Home Energy Monitor display to indicate the level of power being consumed, but this will have to be done carefully not to annoy the user! The problem with this is what constitutes a high level of consumption? To be useful the display needs to 'learn' what's high and what normal level of consumption.

Thanks to Rob Walker and the discussion on this thread for help in implementing this. Rob has also implemented proportional control of the white LED backlight level based on the light level in the room measured by the on-board light sensor (LDR)..nice!

All these changes and some other minor improvements have been committed to the emonGLCD github repository: https://github.com/openenergymonitor/EmonGLCD. Please test and report feedback on the forums.

Update: The single CT Home Energy Monitor emonGLCD example sketch has been updated to also include proportional red LED PWM brightness control corresponding to the amount of energy being consumed.

Embodied Energy of Electronic Enclosure Materials

For us the underlying aim of energy monitoring is energy reduction. It's therefore important that over its useful life an energy monitoring system contributes to the saving of more energy than it involved in the embodied energy of it's production.

Recently we have been having the discussion as to which material is environmentally better to use for electronic enclosures.

So I did some research:

Caution: The figures below were obtained from reputable sources but should not be taken on face value.
  •  Extruded Aluminium takes approximately 40-80% more energy (KWh/Kg) to produce than ABS plastic [1][2] *
  • Aluminium is widely and easily recycled (even if its been anodised [2]) and the recycled product is of just as high a quality as the original. ABS plastic can be recycled in some locations but the recycled product is of much lower quality than the original, 'downcycling' would be a better term! 
  • Recycled aluminium takes about 30% less energy (KWh/Kg)  to produce than ABS plastic [3].
  • Plastic is made from oil which is a non-renewable fossil fuel.
  • Aluminium is the most abundant metal in the Earth's crust, extracting it requires lots of electricity which could be generated from renewable sources. 
With current processing and recycling methods we think aluminium could be the best material to use, it does take more energy to produce in the first place but once produced it can be recycled again and again to make new things with little extra energy.

What do you think?

References:
[1] http://www.inference.phy.cam.ac.uk/withouthotair/c15/page_88.shtml
[2] www.victoria.ac.nz/cbpr/documents/pdfs/ee-coefficients.pdf
[3] http://www.worldchanging.com/archives/005656.html

*Aluminium is about 2.6 times denser than plastic therefore a similar case made from plastic could be lighter. Further research is required before drawing a conclusion. 

Engineers thermometer

I have just configured an emonGLCD and a battery-powered emonTx unit with 3 temperature sensors. This would make a useful heat-pump engineers tool, and probably has many other uses.


The emonTx has 2 probes (DS18B20's) on 2m cables, and one on-board the PCB. It's battery powered so can be put anywhere in range. The emonGLCD display shows the 3 emonTx temperatures and also a local temperature.  Temperatures are transmitted via wireless from the emonTx to the emonGLCD every 2 seconds.

Typical uses would be for balancing radiators. i.e T1 on the flow, T2 on the return. I have added T1 - T2 (delta T) because that is what you are often looking for.   It could also be used for air-in, air-off off an air source heat pump, or and flow/return situation.   It would make a good tell-tale device. i.e. to alert if any system goes out of its best operating ranges.

I also have the temperatures data going to a Nanode emonBase to be logged to emoncms so that graphs can display temperatures over time. You really need this to balance up central heating radiators. i.e. fix it to a different radiator every day and compare results. The flows can be balanced accordingly.

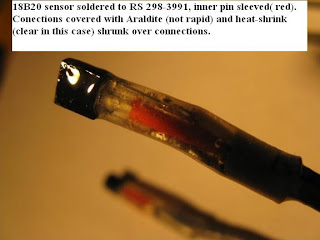
The DS18B20's are not ideal because they are a bit chunky (as opposed to thermocouples). On the other hand, the accuracy is excellent and it seems that the values can be relied upon. I have chosen to pot-up the probes myself.


They are fragile, and the ready-made sensors from the OpenEnergyMonitor shop are much more rugged and can easily be tie-wrapped to a copper pipe and insulated etc.

Next thing is to battery-power the emonGLCD so it becomes a portable tool.  

Another addition would be a LCD pulse input. This would give me a reading of kWh, and would save me using a stop-watch, as I have many over the years.

Adapting these devices could get addictive!!

By John Cantor heatpumps.co.uk


A short video of OpenEnergyMonitor Labs

Timelapse footage from inside and outside OpenEnergyMonitor Labs here in the mountains of Snowdonia, North Wales, UK.


We had lots of fun making this. If only each day was longer!

Faulty Batch of MCP1702 Voltage Regulators

We have noticed recently that a number of people have been having problems with the Nanode RF. The problems were brought to our attention through this thread on the forums.

Many people were getting the message "Failed to access Ethernet controller" when running an EtherCard example.

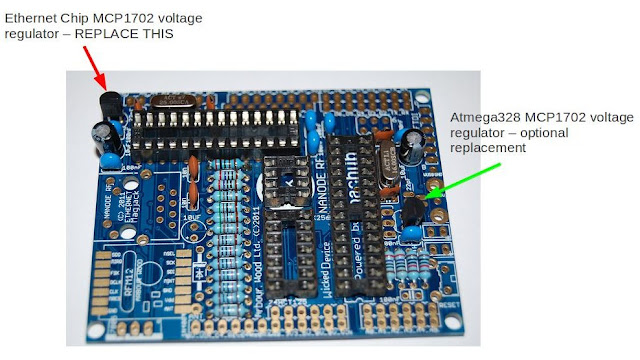
After much testing we have identified the problem. It turns out that the MCP1702 3.3V voltage regulator which supplies 3.3V to the Ethernet Chip (ENC28J60) was not supplying enough current to power the chip. The voltage was dropping down to 2.6V under load.

Swapping the voltage regulator for one from a different batch solved the problem. it looks like we have been sent a faulty batch of voltage regulators, our apologies for not spotting this sooner.

Note: this problem only applies to the MCP1702 voltage regulators in the latest batch of Nanode RF kits. All emonTx and emonGLCD kits are un-effected, they have always used regulators from another source.

If you have this problem we will send out two replacement regulators free of charge, one for the Ethernet chip and the other for powering the Atmega 328, it may be ok to leave the Atmega328 voltage regulator in place as the current requirements are not as high and it seems to work fine here without swapping it out, but we will send two out so that you can swap out as you prefer.


We have created a free voltage regulator entry in the online shop, just quote your previous OpenEnergyMonitor order ID when ordering and we will send them out: http://shop.openenergymonitor.com/nanoderf-mcp1702-voltage-regulator-replacement/.

All the Nanode RF's kits sold through the shop from today onwards will contain the non-faulty voltage regulators.

De-soldering tips
The easiest way to de-solder the regulator is to if possible cut two of the regulator legs, you can then pull out the third by pulling on the regulator body itself while holding the soldering iron tip on the solder surrounding the leg. Then use pliers to pull out the other legs one by one. It is usually easier to pull the legs out if there is actually plenty of (molten) solder around the leg. To clear the holes of solder with a solder sucker again make sure there is plenty of solder in the holes to start with, this usually leaves the cleanest result in our experience. An extra pair of hands can help make the whole job easier. 

elektro:camp(«2012.05») Workshop | Offenburg-Germany

Hackathons are great! The next one I am attending will be the electro:camp in Offenburg, in Germany, close to the french border. I think Trystan and Glyn will also be there as well as a number of cool hackers and makers, all interested in energy and automation.

Many great developments will result from this event and hope to see some of you there as well.

Here is the official website: www.elektro-camp.de


Speeding up emoncms feed data requests


If you log 5 second data you quickly amass a huge number of datapoints (about 6 million a year). If you then tried to visualise a years data by loading all 6 million datapoints you would be waiting a long time. The most we would want to load is the same number of datapoints as the pixel width of the visualisation, lets say around 1000 datapoints. So we need some way of picking out of our 6 million datapoints 1000 datapoints at equal interval.

When I first wrote emoncms I searched for mysql queries that could pick out table rows at given intervals and came across the following query that does this:

SELECT * FROM (SELECT @row := @row +1 AS rownum, time,data FROM ( SELECT @row :=0) r, $feedname) ranked WHERE (rownum % $resolution = 1) AND (time>'$start' AND time<'$end') order by time Desc

It seem to work really well. Fast forward 5 months my feed tables are approaching 2.5 million rows  and I'm starting to notice query times getting really quite long. After a bit of searching again, I came across a suggestion to a similar problem suggesting the use of an index. So I tried adding an index and creating a php for-loop to request a single row at given intervals:

$range = $end - $start;
$interval = $range / 1000;

for ($i=0; $i<1000; $i++)
{
  $qtime = $start + $i * $interval;
  $result = db_query("SELECT * FROM $feedname WHERE `time` >$qtime LIMIT 1");
  if($result){
    $row = db_fetch_array($result);
    $data[] = array($row['time'] * 1000, $row['data']);    
  }
}

The following table shows the typical times for requesting data from both the indexed and non indexed tables and the different methods. At the same time I also tested whether request times where affected by the data type that time is stored as: mysql datetime or a unix timestamp stored as an unsigned int.


So it looks like the optimum configuration is primarily the addition of an index and use of the php data request method and then to reduce disk space use, switching to unix timestamp. The next step is to create a script to automate table conversion from datetime unindexed to timestamp indexed.