OpenEVSE EV Charge Controller
OpenEVSE (recently renamed to OpenEV) design and build fully open-source EVSE (Electric Vehicle Supply Equipment) charge controllers for electric vehicles.
An EVSE charging station, is a device an electric car (EV) is plugged into to charge. It communicates to the car to agree on a charging rate that is the fastest and safest rate both the car and the power supply can support.
Update March 17: OpenEnergyMonitor and proud to announce that we are now the UK / Europe reseller for OpenEVSE charging stations, see OpenEnergyMonitor Online Shop.
Note: this review is my account of using the OpenEVSE in the UK (240V single-phase AC), see OpenEVSE website for official build guides
Features
The features that make the OpenEVSE charge controller interesting to us are:
- WiFi connectivity and remote control (via ESP8266)
- Variable rate of charge: e.g. charge current can be varied to match available power
- Integrated energy monitoring via custom hosted Emoncms data.openevse.com
- Fully open-source :-)
I recently swapped my ageing diesel car for an all-electric Nissan LEAF (it’s fantastic), so it felt like the perfect time to build and test an OpenEVSE charge controller unit!
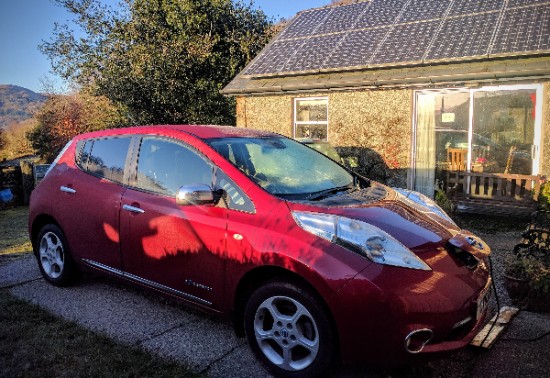
Nissan LEAF charging from solar PV on a frosty morning:
Safety
Even though it is possible to charge an EV via a standard electrical outlet, it is not recommended for a number of reasons:
- Charging is very slow since the current is limited by the electrical outlet.
- Drawing a significant current (approx 10/12A) for an extended period (up to 10hrs for a 24KWh Nissan LEAF and 30hrs for a 90KWh Tesla Model S!) puts stress on the domestic wiring resulting in heating of the wire or worse if the wiring is in a poor state.
Charging via a properly installed EVSE is the fastest and safest way to charge an EV at home.
OpenEVSE units have been designed to exceed the safety requirements for EV Charging Stations from SAE J1772, NEC and UL. Before supplying power to the car (and continuously while charging) the EVSE unit conducts a number of checks, no power is supplied until all the checks have passed. See OpenEVSE Safety Features
Purchase
Update: we are in communication with OpenEVSE to put together a UK/Europe specific OpeneEVSE package to resell via the OpenEnergyMonitor Online Shop.
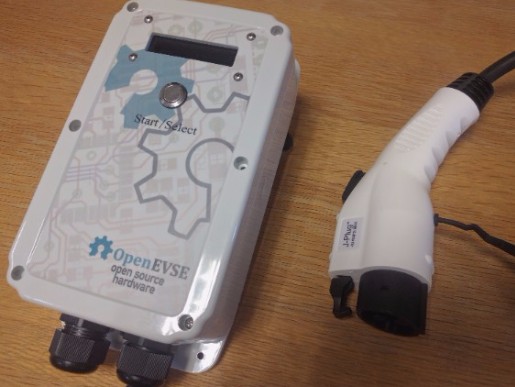
OpenEVSE units can be purchased (kit or fully assembled) from the OpenEVSE online store, the units are shipped from California USA. I went for a P50D Level 2 Deluxe OpenEVSE kit with the WiFi connection kit and J1772 Cable.
The OpenEVSE 50A L2 unit will charge any J1772 compliant car at up to 40A continous from a single phase 208-240V AC supply. However, you can dial back the current by setting the ‘max charge current’ to match your supply.
Full disclosure: Chris Howell from OpenEVSE made the unit available free of charge for me to evaluate and improve the Emoncms / OpenEnergyMonitor integration.
Assembly
Warning: Assembly of an EVSE requires wiring Alternating Current (AC) components that will be exposed to voltages from 100 to 250v. If you do not have the experience and knowledge required to safely work with AC voltages please consult with an experienced electrician for assistance and inspection of your work.
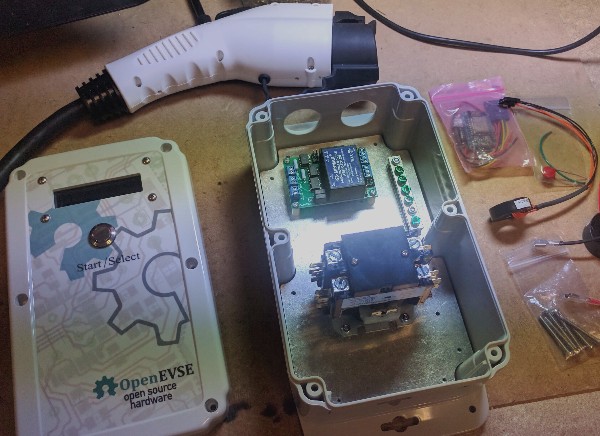
Assembly of the unit was straight forward following the openEVSE build guide. No soldering was required, only basic tools e.g. screwdriver, wire strippers etc. Assembly probably took me a couple of hours. I took my time to do a high-quality job of assembling, this is particularly important given the high currents involved.
The hardware components are all top quality, I was impressed by the attention to detail such as rubber seals around the LCD to waterproof the unit.
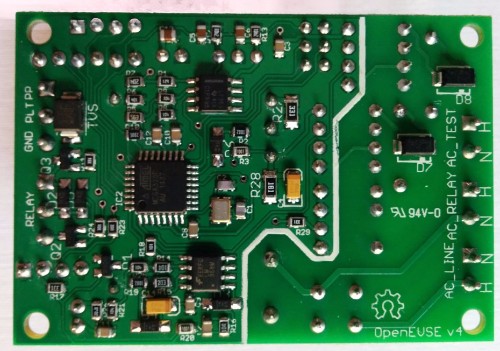
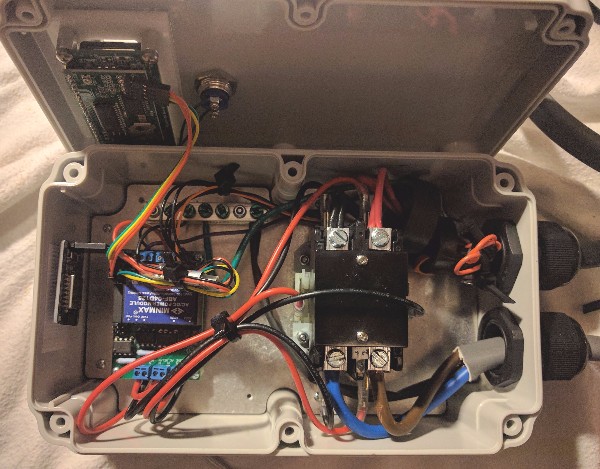
The hardware inside the unit is split into two main components which are physically separated: a high voltage and high current relay and a low voltage control electronics which is the microcontroller (ATmega328p) ‘brains’ of the unit. My unit contained an OpenEVSE Plus V4 control unit see Datasheet:

Rear PCB showing ATmega328p on the OpenEVSE Plus V4 controller:
Build progress: charge controller, ground busbar, relay, LCD and mode button fixed into enclosure
The finished build: WiFi ESP8266 module is visible on the top left.
Installation
Installation should be undertaken by a qualified electrician. The unit should be wired in using suitably rated cable ideally with a dedicated RCD circuit breaker. The max charge current of the unit should be set to match the supply circuit wiring.
Operation
On first powerup some basic settings are set via the LCD menu using a combination of short/long presses of the front button. The menu system is impressively responsive considering it’s running from an ATmega328! The basic settings include max charge rate (set to match wiring), charging service level and date-time. Settings are saved to EEPROM and date-time is kept up-to-date via a RTC battery backup.
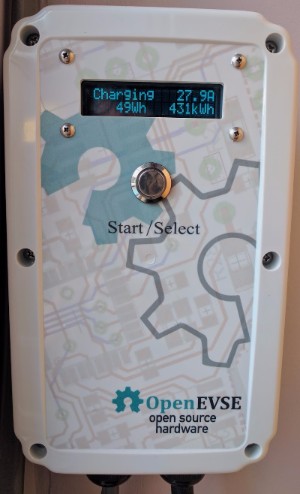
The basic operation is very straightforward: just plug the car in and charging begins! Charging can be stopped/resumed by pressing the button on the front of the unit. Charging state is indicated by the backlight colour of the LCD and basic info such as current charging current and total kWh is displayed on the LCD.
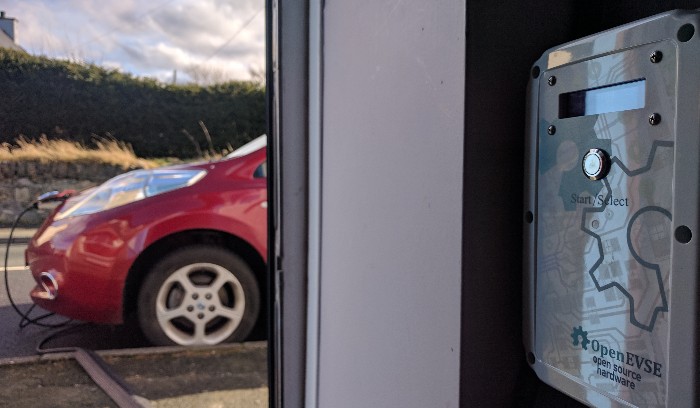
Here is a photo of the unit charging my Nissan LEAF @ 26A. At this charge rate my 6.6Kw charge (24Kwh battery) Nissan LEAF will charge from flat in about 4hrs:
Here’s a demo of the basic features of the unit:
Remote Datalogging
The Wifi kit (ESP8266) enables data logging from the OpenEVSE unit to a custom Emoncms server data.openevse.com via a local Wifi connection. The Wifi kit also allows remote control (see RAPI commands below).
Remote Control (via RAPI commands)
The OpenEVSE unit can be controlled and monitored remotely via serial RAPI (Remote API) commands. These commands can be issued directly via serial or the OpenEVSE WiFi kit (ESP8266) can be added to allow RAPI commands to be issued remotely via an HTTP web interface.
Variable Charge Rate
OpenEVSE charge controller can vary the charge rate, or more specifically the OpenEVSE can ‘request’ a particular charge rate from the car. It is actually the cars charging control electronics that varies the charge rate. OpenEVSE requests a particular charge rate by varying the pilot signal square wave duty cycle see OpenEVSE technical theory of opperation. Charge rate can be varied from 6A (SAE/IEC standard min charge current) up to max charge rate (28A for my Nissan LEAF) in 1A increments. The car responds almost instantly to a charge rate adjustment request from the OpenEVSE controller. Charging can also be paused and resumed remotely if required.
Example:
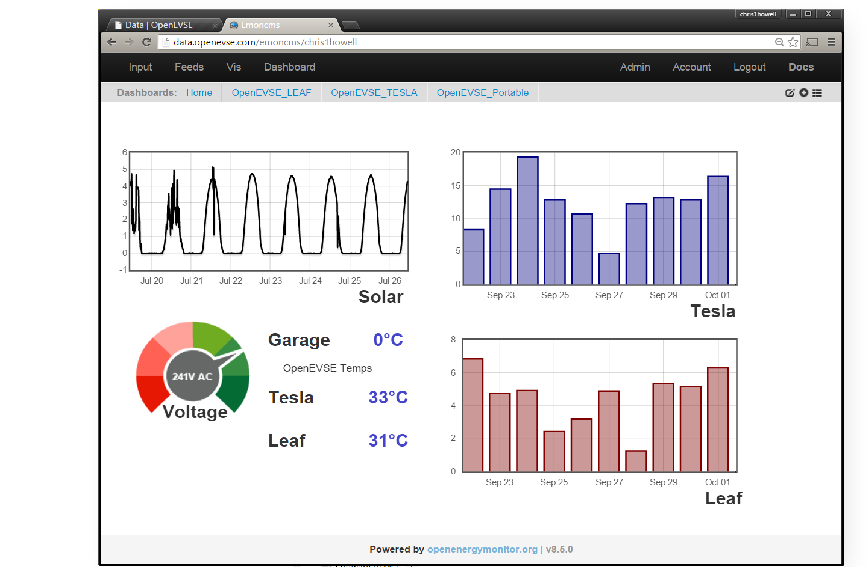
$SC13 will set the current charge current to 13A. The screen shot on the right below illustrates issuing the $SC 13 RAPI command into the OpenEVSE local web page interface (served from ESP8266). The screenshot on the left shows the effect of reduction in charge rate as monitored by emonPi displayed using Emoncms:

Rapi commands can also be issued directly via a single HTTP request. Eg. the same rapi command to set charging rate to 13A:
http://192.168.0.108/r?rapi=%24SC+13
To sleep (pause a charge) issue RAPI command $FS
http://192.168.0.108/r?rapi=%24FS
To enable (start a charge) issue RAPI command $FE
http://192.168.0.108/r?rapi=%24FE
Assuming 192.168.0.108 is the local IP address of the OpenEVSE ESP.
There is also an OpenEVSE RAPI command python library.
RAPI commands can be used to control and check the status of all OpenEVSE functions. A full list of RAPI commands can be found in the OpenEVSE plus source code.
Future developments
I would like to add MQTT support to the OpenEVSE WiFi ESP8266 firmware, this will allow RAPI commands to be issued via MQTT over an authenticated local MQTT server e.g. emonPi / RaspberryPi or remote MQTT server e.g. Hive MQTT / Cloud MQTT. Using MQTT will make it easier and more secure to control the OpenEVSE. MQTT allow easy integration with all home automation and control platforms e.g nodeRED / OpenHAB / Emoncms.
UPDATE Oct 17: WiFi V2 is now stable release with web-UI interface, RAPI over MQTT and solar PV divert feature. See OpenEVSE WiFi V2 Documentation
Open Source
The source code and CAD hardware designs for the OpenEVSE unit can be found on github:
- OpenEVSE I2C LCD + RTC
- OpenEVSE Plus Controller Hardware
- OpenEVSE Plus Controller Firmware
- OpenEVSE Plus Controller Pre Compiled Firmware
- OpenEVSE ESP8266 Wifi V2 firmware
- OpenEVSE Enclosure
Related Forum Threads
See OpenEV forum section for related discussion.
To engage in discussion regarding this post, please post on our Community Forum.