Pebble Smart Watch Emoncms Heating Control Demo
The Pebble is a Bluetooth connected smart watch which works with Apple and android smartphones. Using an e-ink display the Pebble watches achieves a week of battery life. Very impressive from a hardware point of view. I've been using a Pebble with my android phone for the past couple of weeks and found the Pebble to be useful for keeping up with notifications while out out and about and especially for controlling music, navigation directions and activity tracking while out biking, running, driving and even swimming!
The thought occurred to me that the Pebble could potentially be a super convenient way to quickly control my heating. I've got working a simple demo to turn my heating on and off, the could easily be extended to allow setting a set point.
When the Pebble was first released my friend Ryan Brooks put together a demo to display feed data from Emoncms on the pebble. The code for this demo is up on GitHub, however since then things have moved on, Pebble have released SDK 2.0 and launched the pebble app store allowing many applications to be easily loaded onto the Pebble. One of the more powerful applications is Pebble Tasker, when linked with the main Tasker App on an android phone the possibles are endless. See my previous blog post on using Tasker to display Emoncms notification on an android phone. Taking inspiration from Nathan Chantrell's home automation setup using Pebble and Tasker I decided to have a go at directly controlling my heating from my Pebble, here is the result:
Here are the steps to replicate this system:
1. Install Emoncms on a Raspberry Pi and enable RF12 Packetgen Module
I used the new pre-built SD card image for the low write version of emoncms, downloadable from the link below. This is soon to become our default Raspberry Pi pre-built image once testing is complete
Following the setup guide enable local logging and configure emonHub
The heating control setup requires the emoncms Packetgen module. Follow the steps to enable packetgen to work with emonHub.
More info on packetgen module can be found: https://github.com/emoncms/packetgen
2. Setup RFM12B receiver and control relay
To perform the actual control of the boiler you will need to setup an RFM12B receiver node with a relay or similar. The actual hardware setup will depend on what you want to control, a JeeLink or partially populated emonTx V2 work well as a good base for the control hardware. See my previous post on heating control for more info regarding the hardware. The packetgen module will provide an example Arduino sketch to upload.
3. Install and Configure Tasker on your android Phone
https://play.google.com/store/apps/details?id=net.dinglisch.android.taskerm
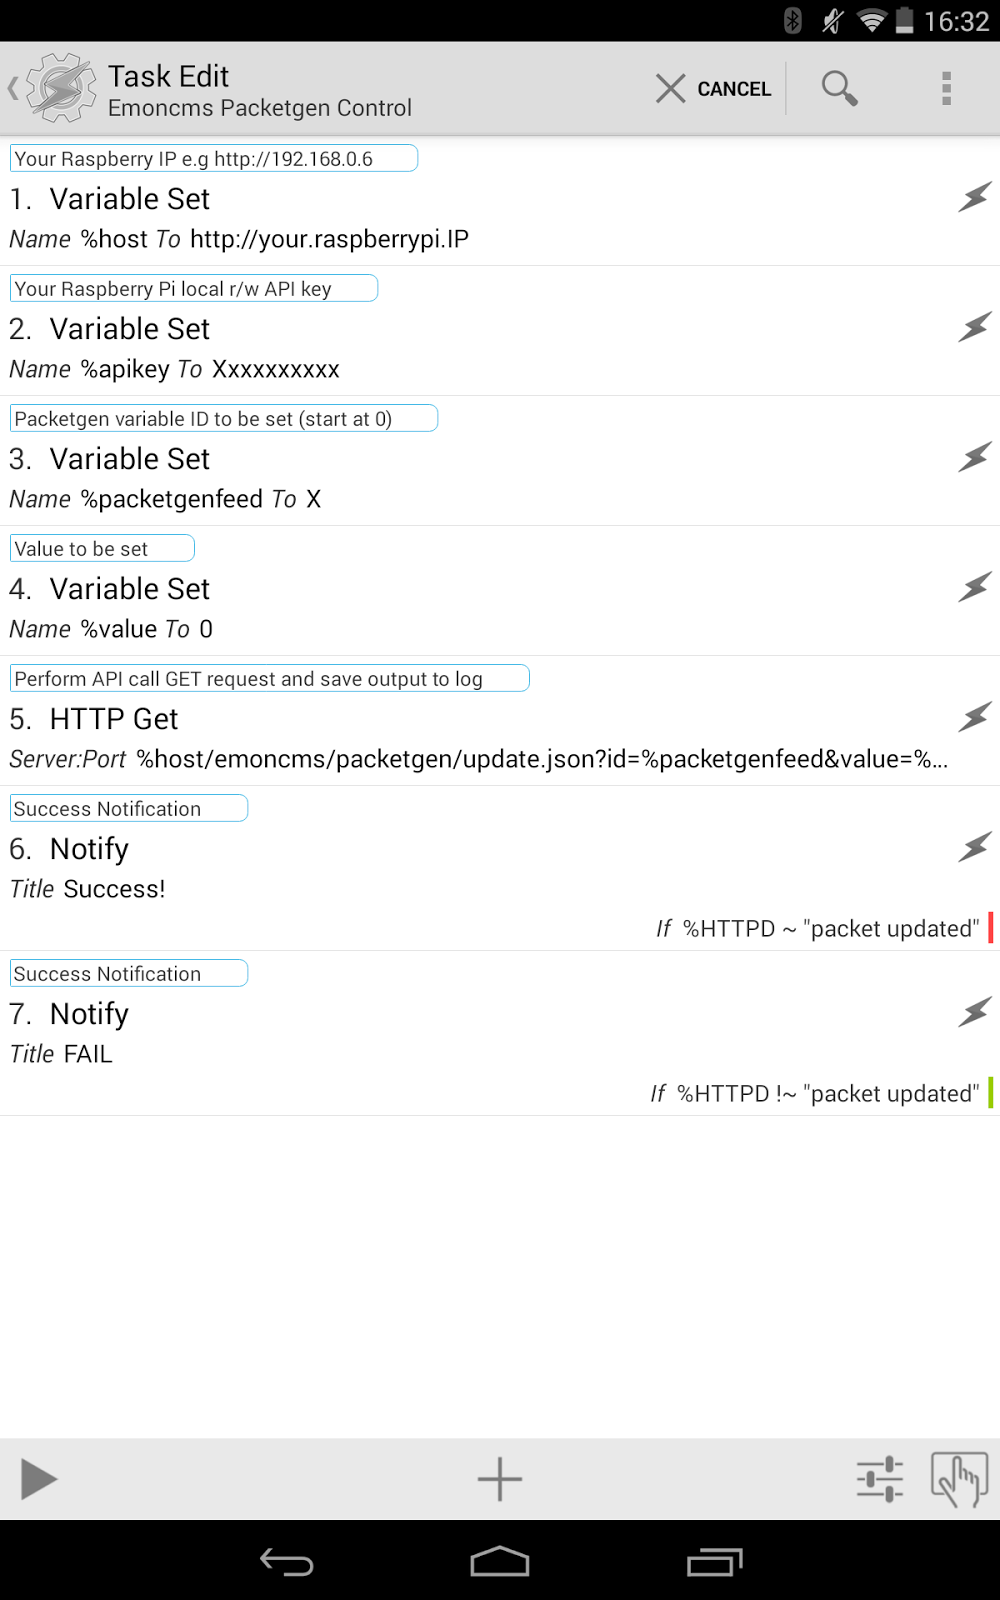
ID is the id of the packetgen variable (they start at 0) and value is the value to be set, the example above will turn the heating on setting variable 4 which in my setup is a boolean control variable to '1'. You can test if this is working by calling the API in your browser.
I've created a Tasker template task which calls the above API which can be downloaded from Github and imported into Tasker, follow instructions on Github Readme. Variables should be self-explanatory.
https://github.com/emoncms/androidTasker

Home screen Tasker task shortcut widgets can be created on your android home screen to allow Tasker tasks to be easily activated, or profiles can be setup to turn the heating on as you arrive home / leave work or certain times per day. The possibles are endless! Just make sure your system has some hardware fail-safe so you don't get home to a house like a sauna or worse!
The emoncms API to set a packetgen variable is as follows:
http://YOUR_EMONCMS_SERVER_IP_OR_HOSTNAME/emoncms/packetgen/update.json?id=4&value=1&apikey="YOUR_RW_APIKEY"
http://YOUR_EMONCMS_SERVER_IP_OR_HOSTNAME/emoncms/packetgen/update.json?id=4&value=1&apikey="YOUR_RW_APIKEY"
ID is the id of the packetgen variable (they start at 0) and value is the value to be set, the example above will turn the heating on setting variable 4 which in my setup is a boolean control variable to '1'. You can test if this is working by calling the API in your browser.
https://github.com/emoncms/androidTasker
If a successful response is received from the Emoncms server a 'success' notification is displayed, else a fail notification is activated.
Home screen Tasker task shortcut widgets can be created on your android home screen to allow Tasker tasks to be easily activated, or profiles can be setup to turn the heating on as you arrive home / leave work or certain times per day. The possibles are endless! Just make sure your system has some hardware fail-safe so you don't get home to a house like a sauna or worse!
If you are setting up Tasker yourself from scratch setup GET requst as follows:
New Task > + new action > net > HTTP GET > enter HTTP API above into host and (optionally) write output to log file
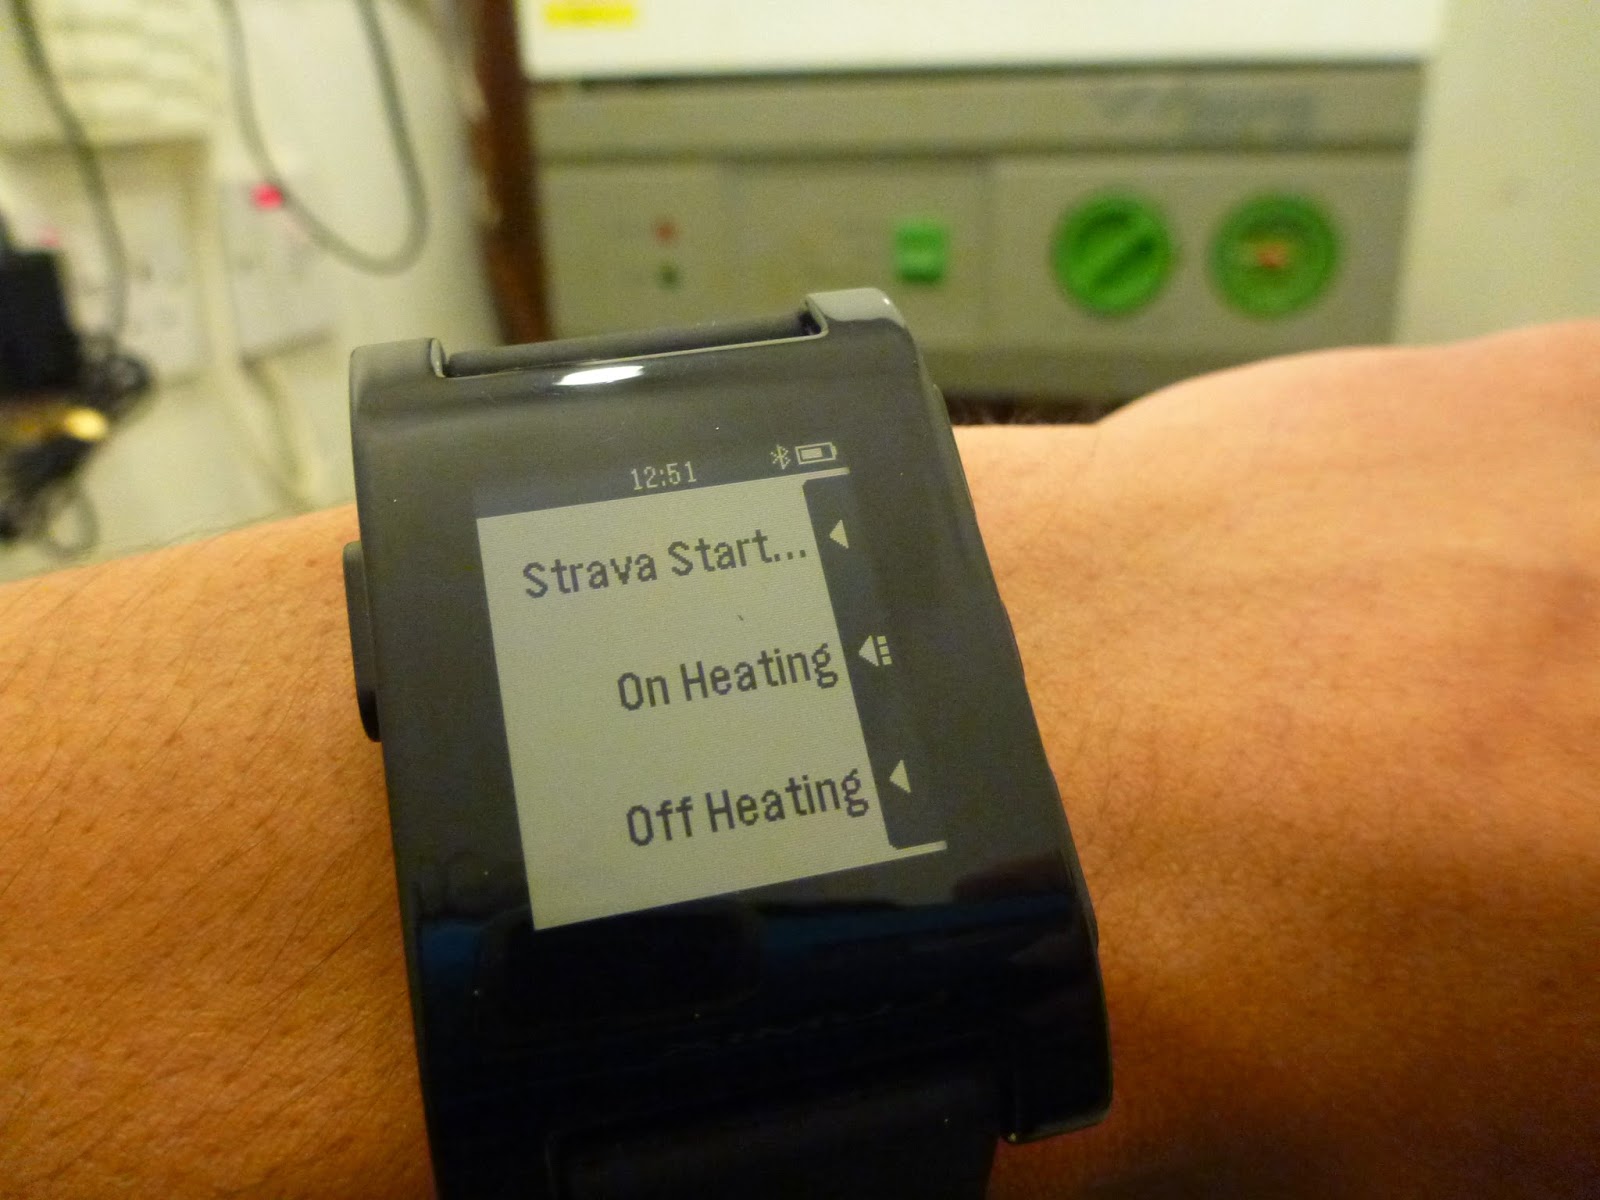
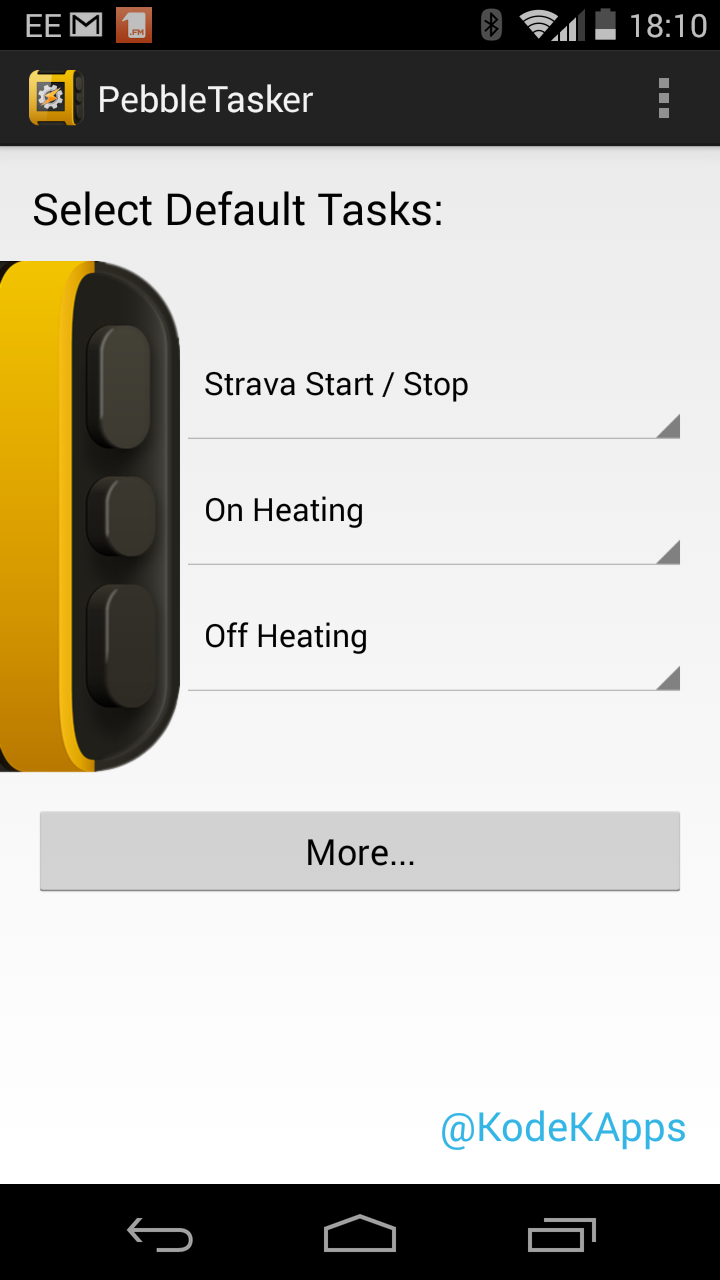
4. Install & configure Pebble Tasker on the Pebble Watch
To map Tasker tasks to allow easy control from a Pebble
Other Pebble Tweaks I've found useful
While not directly relevant to heating control here are some further details of my Pebble smartwatch setup:
- Using PebbleBits firmware on the pebble to quickly launch pebble apps from the watch face
- Using Tasker to Stop / Start Strava
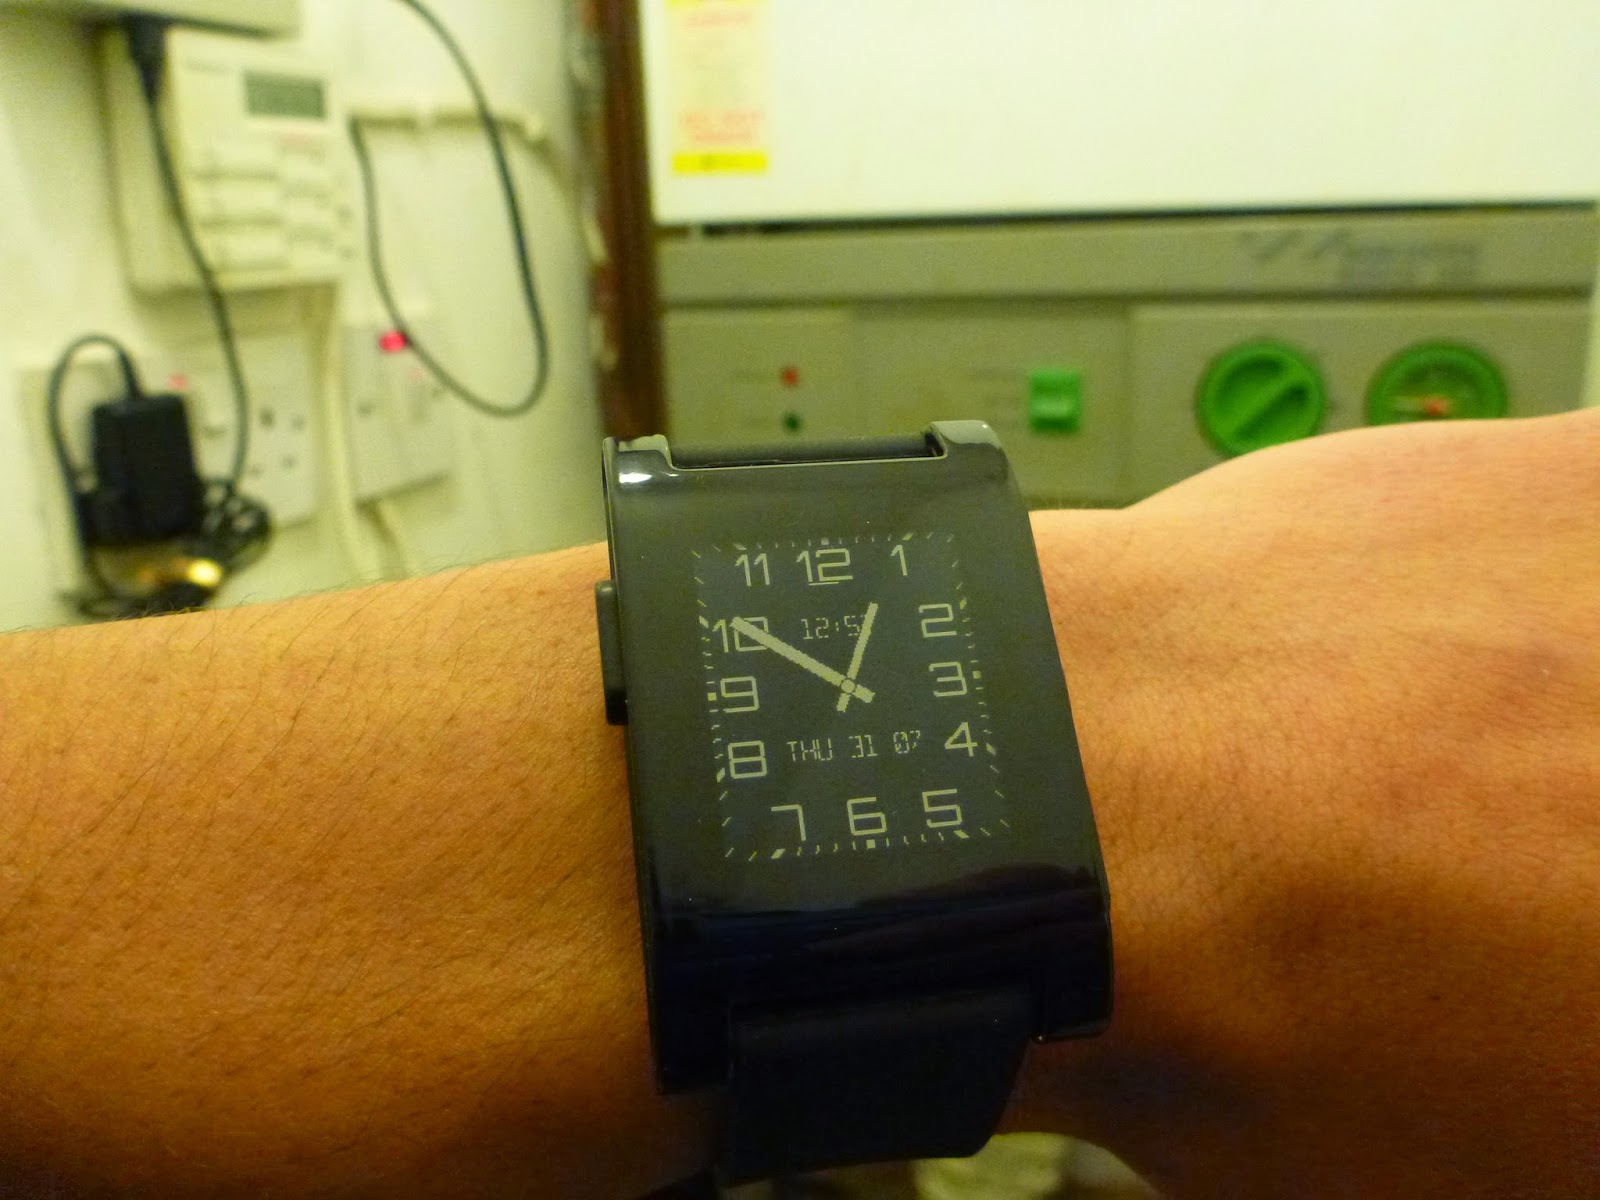
- Modern Watchface is my favourite watch face (shown in demo above)
- Music Boss is great for controlling music and starting podcasts while driving or biking
- NavMe is great for directions on the Pebble while on the bike
- Tasker can be used to send commonly sent SMS's and call favourite contacts direct from the Pebble
To engage in discussion regarding this post, please post on our Community Forum.