OpenEnergyMonitor, emonPi and openHAB
Using the emonPi in it's current default configuration works great to post data to Emoncms for logging and visualisation. However there may be times when you want some more flexibility and or ability to interface with other hardware or services
In my last few blog posts I have been taking a look at making the emonPi the heart of a smart energy optimised home and how live energy monitoring data from the emonPi can easily be used to inform other services:
3. Controlling LightWaveRF devices on the emonPi (OOK RF Tx)
Following on from my last post on controlling LightWaveRF devices from the emonPi using MQTT we now need a front end interface to handle the control. I have recently been taking a look at how openHAB can be configured to provide a front end interface to OpenEnergyMonitor hardware and control.

We are working on releasing an updated pre-built SD card stack for the emonPi which will include Emoncms V9, MQTT, Node-RED and openHAB all pre-configured. I hope to post a beta image download to the forums in the next few days.
Open Home Automation Bus (openHAB) is "a vendor and technology agnostic open source automation software for your home". OpenHAB can run on an emonPi (Raspberry Pi) and is very flexible and can be configured for just about any home automation task. This high level of configurability can also make it seem quite hard to understand to start with. I've have put together a skeleton config to setup openHAB with to OpenEnergyMonitor pulling data from the MQTT server running on an emonPi.
Once setup you simply browse to http://emonpi:8080/openhab.app?sitemap=oem to view the openHAB user interface. openHAB also has a nice android or IOS app which can be pointed at the same URL.
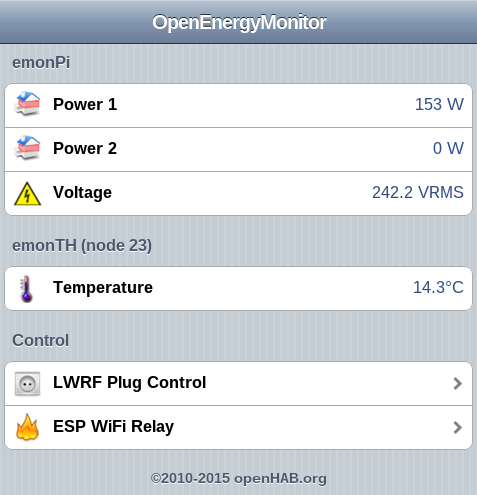 |
| openHAB OpenEnergyMonitor skeleton setup |
 |
| openHAB android app |
 |
| openHAB LightWaveRF control using openHAB android app |
Installing OpenHAB
I have put together a guide from installing OpenHAB on an emonPi with the config shown above to work with OpenEnergyMonitor on the oem_openHAB GitHub.
OpenHAB Configuration
OpenHAB configuration is based around two files 'items and 'sitemap'. In my openHAB emonPi install instructions I recommend cloning the oem_openHAB to the home directory then soft linking the Items and Sitemap files to the relevant config locations in /etc/openhab/configurations/. This makes the files easier to edit.It's possible to have multiple user interfaces defined by multiple sitemaps e.g oem.sitemap, kids.sitemap or admin.sitemap etc.
Items
The items file defines all the 'things' you might want to view or control in openHAB. Items can be bound to 'bindings' which are optional packages that used to extend functionality of openHAB. This example makes use of the MQTT and HTTP bindings. The items file is usually located in /etc/openhab/configurations/items.
For example the line in the items file to pull power 1 from emonhub MQTT is as follows:
Number emonpi_ct1 "Power 1 [%d W]" { mqtt="<[mosquitto:emonhub/rx/5/values:state:REGEX((.*),.*,.*,.*,.*,.*,.*,.*,.*,.*,.*)]" }
Notice the REGEX is used to tell openHAB that we want the first value in the 11 part CSV emonhub posts to MQTT to emonhub/rx/5/values.
and the items line to control LightWaveRF plug 1 (publish "1 1" to /lwrf mqtt topic) is as follows:
Switch lwrf1 "LWRF Socket 1" {mqtt=">[mosquitto:lwrf:command:ON:1 1],>[mosquitto:lwrf:command:OFF:1 0]"}
See the full items file used for this example on the open_openhab GitHub repo
Sitemap
The second openHAB config file of interest is 'sitemap'. Sitemaps are used to create elements of a user interface for making openHAB items accessible to the frontend interface.
For example the sitemap config line to produce the emonPi Power1 in the interface is as follows:
Text item=emonpi_ct1 icon="firstfloor"
And to produce the LightWaveRF control swithches:
Switch item=lwrf1 label="LWRF Plug 1"
See the full sitemap file used for this example on the open_openhab GitHub repo
I have intentionally kept this 'skeleton' example as simple as possible. To view the full capabilities of openHAB including using groups checkout the openHAB demo and corresponding demo items and sitemap files.
Demo
Here's a quick demo I made using openHAB to control LightWave RF plugs:

To engage in discussion regarding this post, please post on our Community Forum.